
DocAcquire User Guide
Introduction
DocAcquire is an intelligent document processing (IDP) platform designed to revolutionize how organizations handle their documents. It leverages advanced Artificial Intelligence (AI) and Machine Learning (ML) capabilities to automatically extract, validate, and manage critical information from various document types.
Our platform helps you:
- Automate Data Extraction: Reduce manual data entry by automatically extracting key fields and tables from documents like invoices, receipts, contracts, and more.
- Improve Accuracy: Utilize AI models that learn and improve over time, ensuring high precision in data capture.
- Streamline Workflows: Accelerate your business processes by automating document ingestion, review, and export.
- Enhance Data Quality: Ensure the integrity of your data through built-in validation rules and a user-friendly review interface.
DocAcquire is ideal for businesses looking to reduce operational costs, eliminate human errors, and gain faster insights from their unstructured and semi-structured documents.
Getting Started with DocAcquire
Welcome to DocAcquire! This guide will walk you through the initial setup process, from registration to managing your documents.
Step 1: Register Your Account
Fill in your details: Navigate to the DocAcquire registration page and fill in your details (full name, organization, phone number, company email, and a password meeting the specified criteria: minimum 8 characters, including a digit, lowercase, uppercase, and a symbol). Complete the "I'm not a robot" CAPTCHA and click "Register" to submit your information.

Step 2: Activate and Log In
Activate your account: Check your email for an activation link and click it to confirm your account.
Log in: After activating your account, return to the DocAcquire login page and log in using the email and password you registered with.
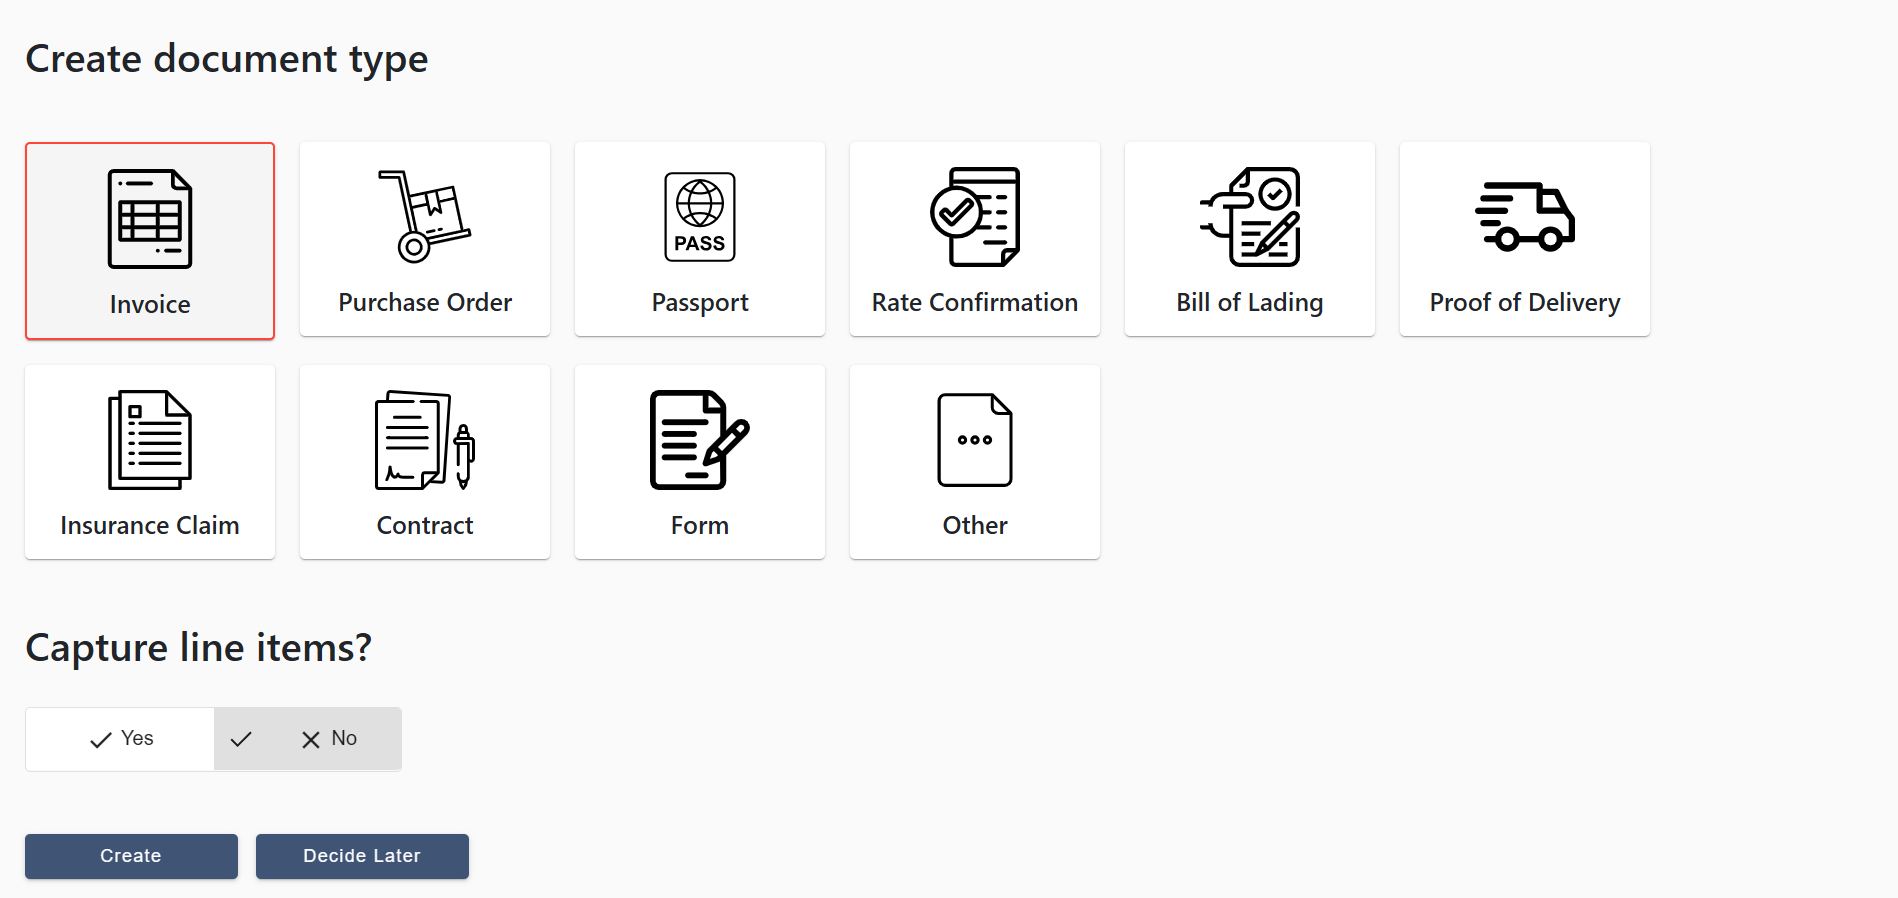
Step 3: Create Document Type
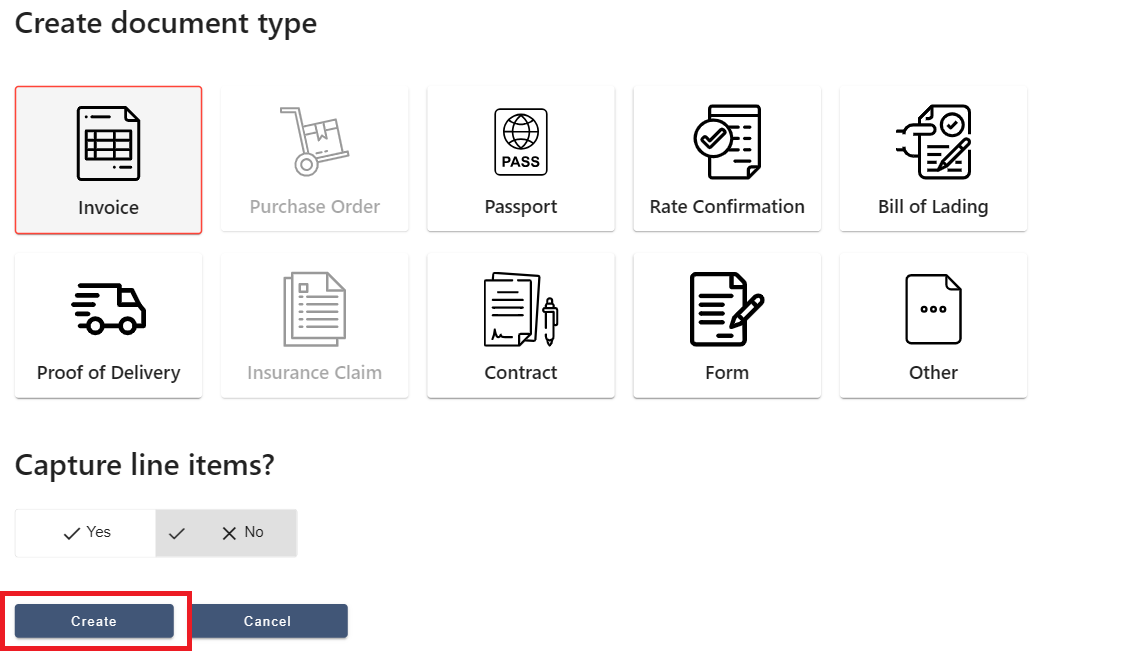
Upon successful login, you will be presented with the "Create document type" page. This is a crucial step before you can upload documents.
- Select a document type: Choose the type of document you intend to process. For example, if you're working with invoices, select "Invoice."
- Capture line items (optional): Decide whether you want to capture line items from your documents. Select "Yes" or "No" accordingly.
- Create: Click the "Create" button to finalize your document type.
Step 4: Upload Documents
After creating your document type, you will be taken to the documents page. Upload your documents manually or via API; DocAcquire will automatically classify and split them, or you can manage this process manually.
Step 5: Review & Export
Once data is extracted, you can review the results and make any necessary corrections.
After reviewing, you have the option to export the data in Excel format or utilize APIs to extract the data for further use.


You are now ready to start using DocAcquire to manage your documents!
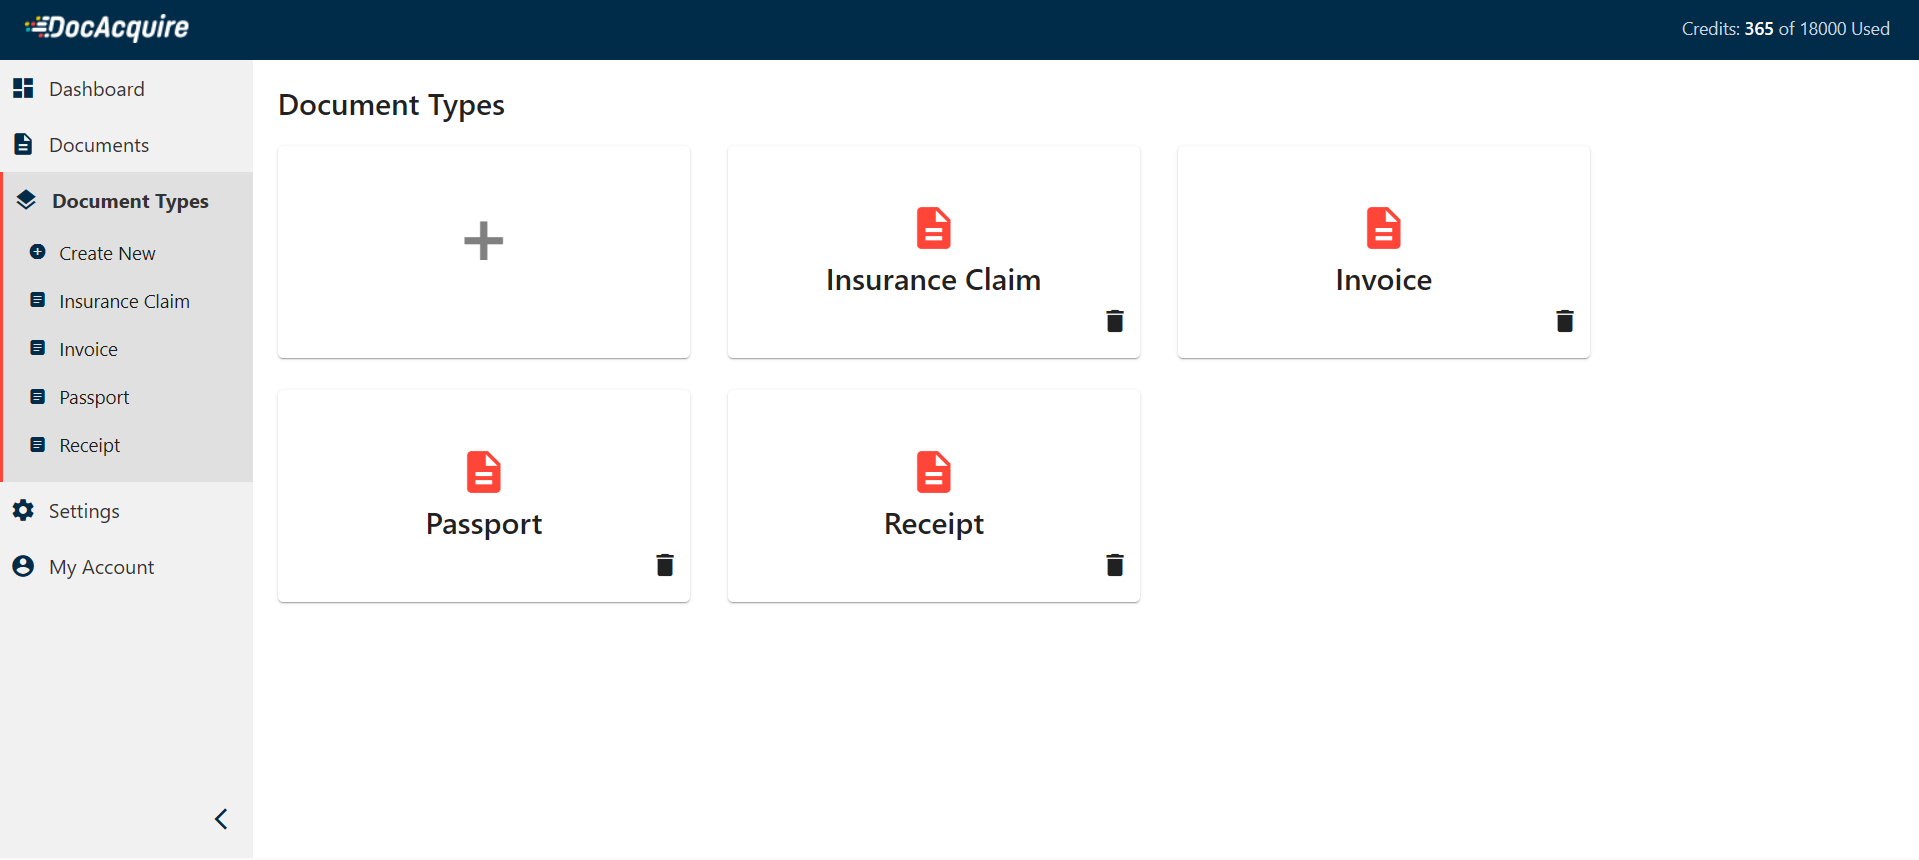
Define a Document Type
Before uploading a document, you need to tell DocAcquire how to handle it by selecting or creating a Document Type. A Document Type defines the fields and logic used to extract data from specific document formats (e.g., Invoice, Receipt, Contract).
Built-in Document Types
DocAcquire comes with a set of predefined (inbuilt) document types for common document formats such as:
- Invoice
- Purchase Order
- Passport
- Bill of Lading
- Rate Confirmation
- Contract
- Form
- Insurance Claim
- Proof of Delivery
These built-in types are preconfigured with key fields and extraction logic, so you can start processing documents quickly without extra setup.
Custom Document Type
If your documents have unique layouts or you need to extract specific fields not covered by built-in models, you can create a custom document type.
To create a custom document type:
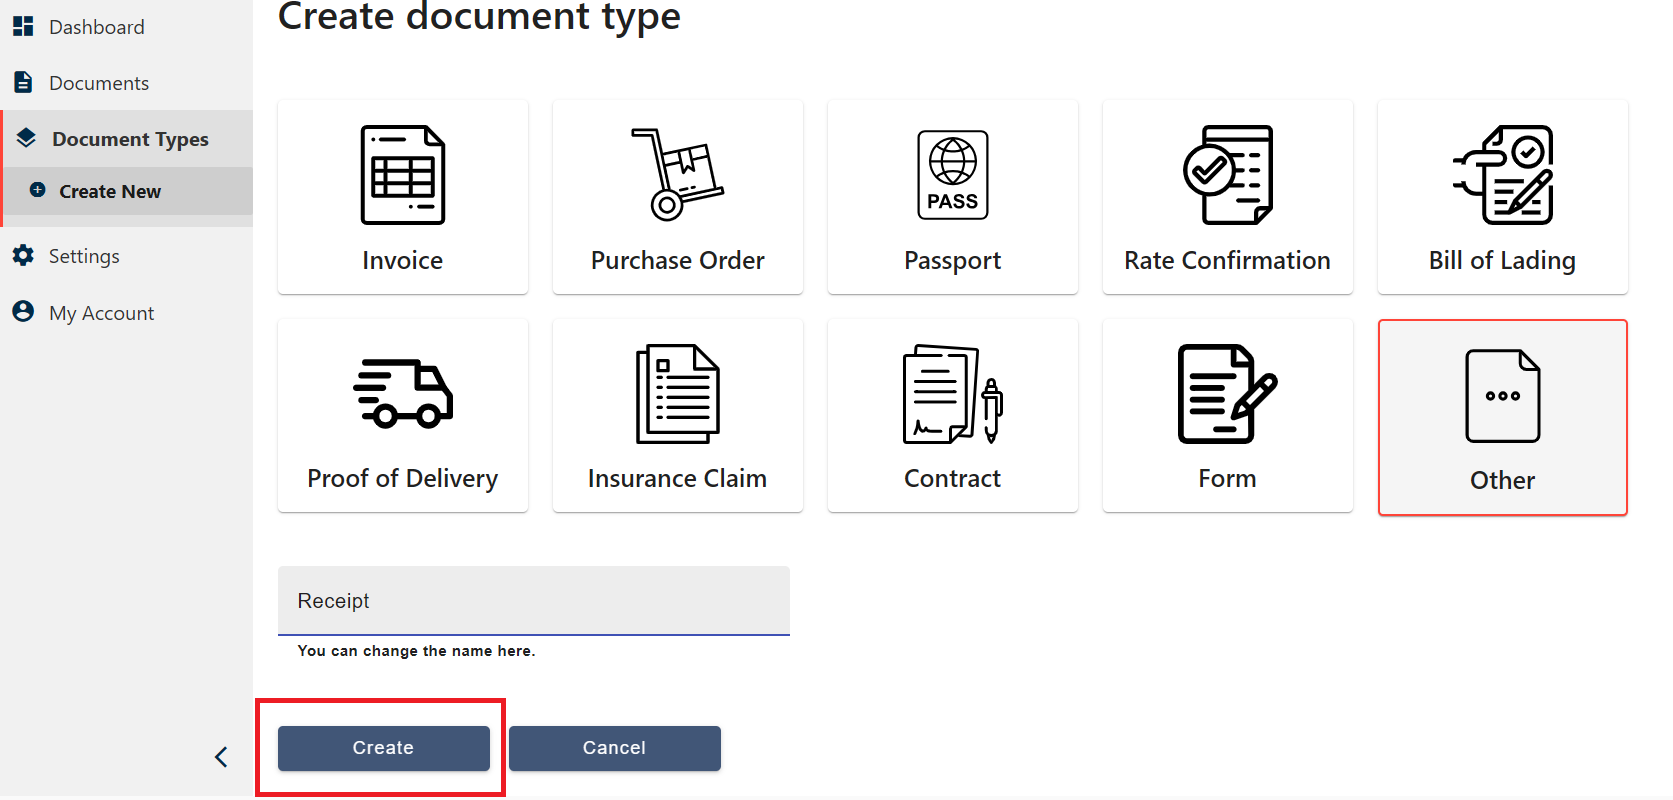
- Go to the Document Types section in the left panel.
- Click "Create New", then select "Other" to create a custom document type.
- Enter a specific name for the document type (e.g., "Receipt") that clearly represents the kind of document.
- Click "Create".
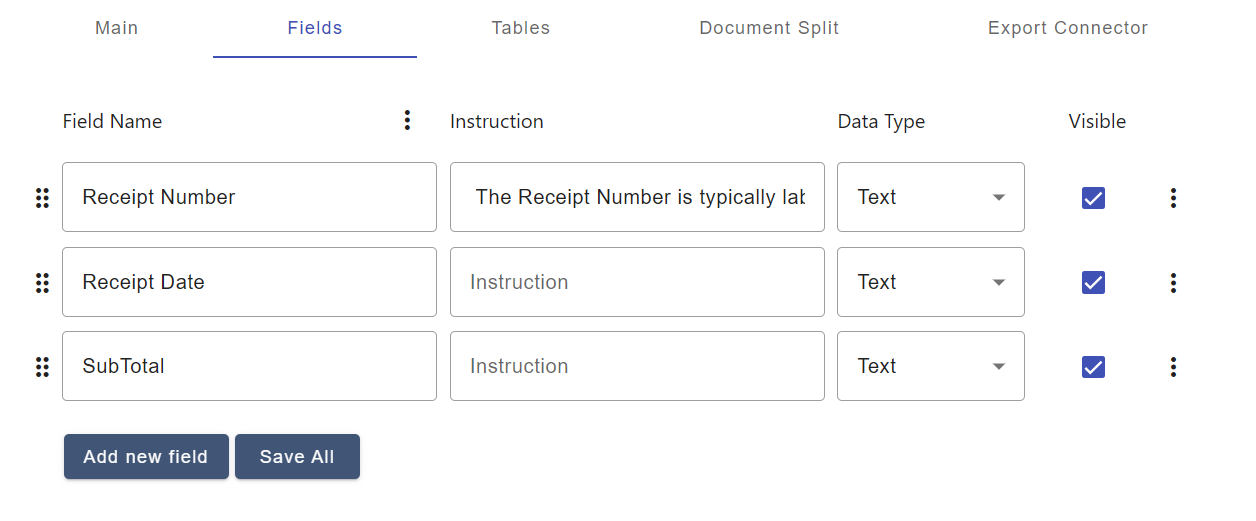
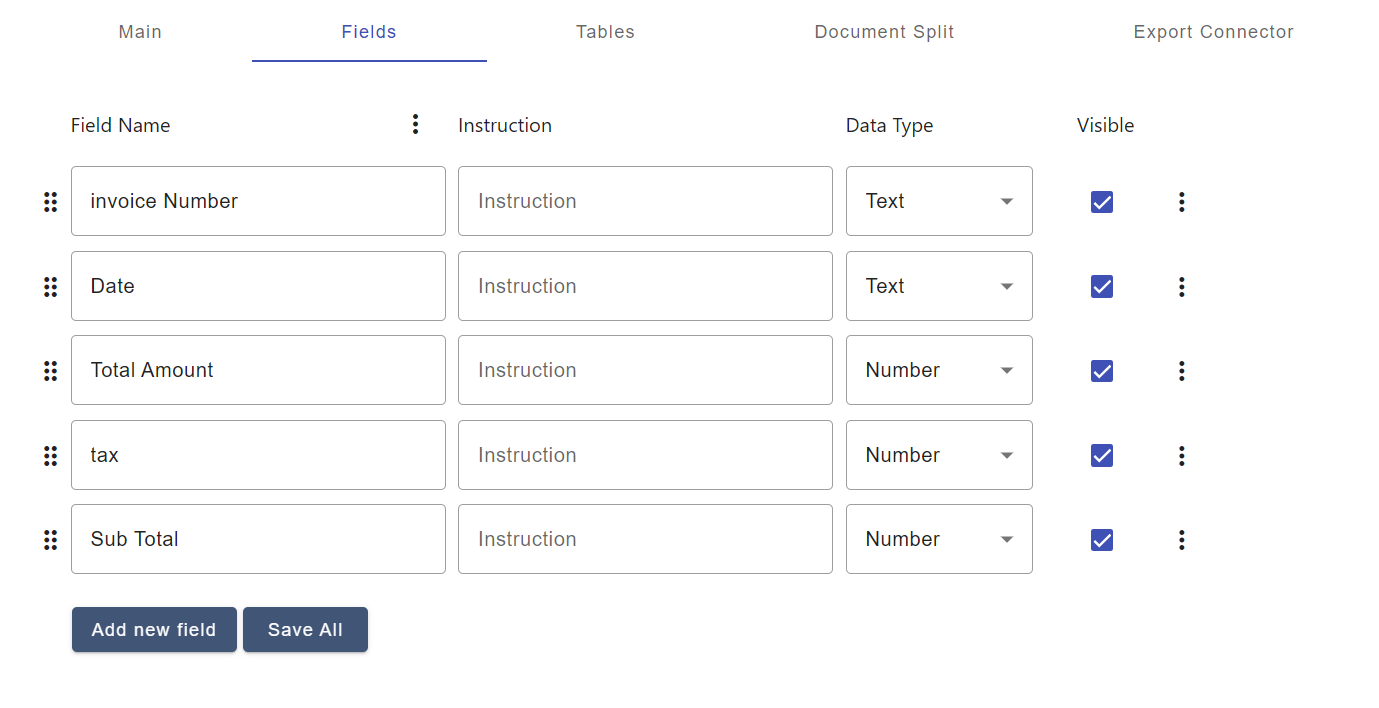
Add Fields
After selecting or creating your document type, define which data DocAcquire should extract.
To capture specific data from your documents:
- Open your Document Type configuration.
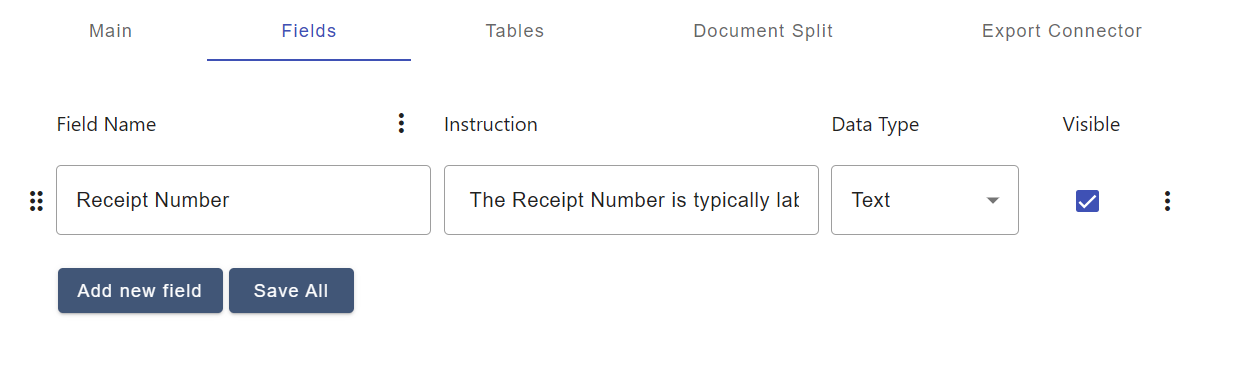
- Under the Fields section, start by adding your first field.
- Define the following for each field:
- Field Name - A short, clear, and specific name that tells the AI what data to extract. Use natural, human-readable labels like "Receipt Number", "Receipt Date", or "Subtotal". (e.g., Receipt Number — this clearly tells the AI to look for the unique receipt identifier.)
- Instruction (optional) - This can be added to guide more complex or ambiguous extractions. Write the instruction in natural language to explain where or how to locate the field in the document. (e.g., The Receipt number is typically labeled as "Receipt No." or "Receipt #" and is found near the top right.)
- To add more fields, click "Add new field".
- Once all fields have been added, click "Save All" to finalize the field configuration.

Note: Instructions take precedence over the field name when both are provided. That means the AI will primarily follow the instruction if present.
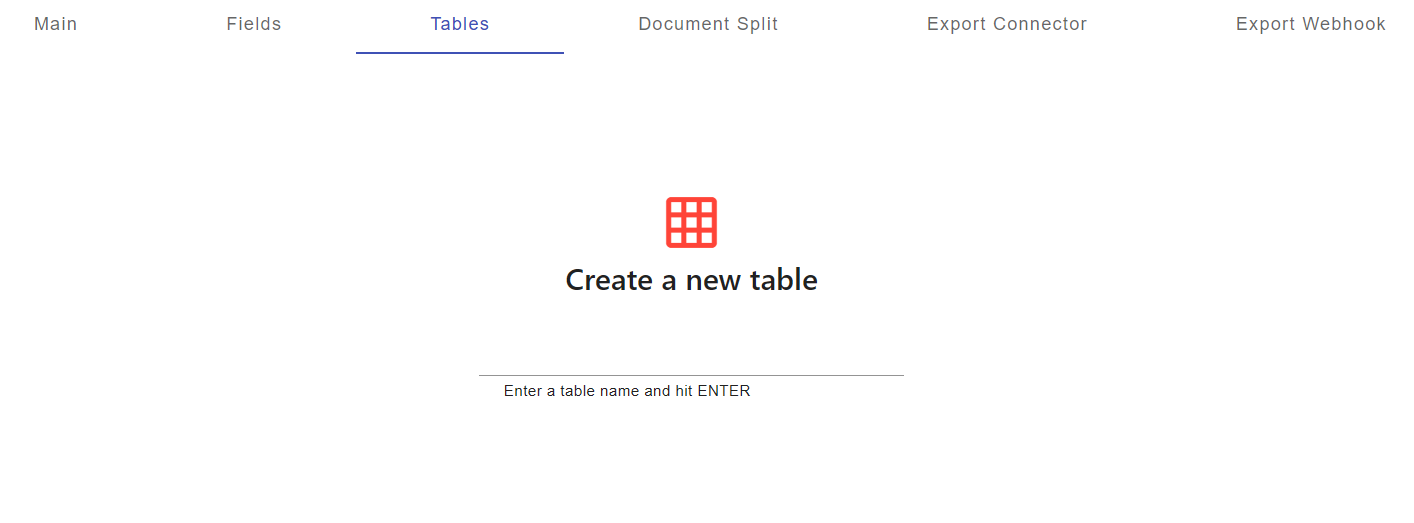
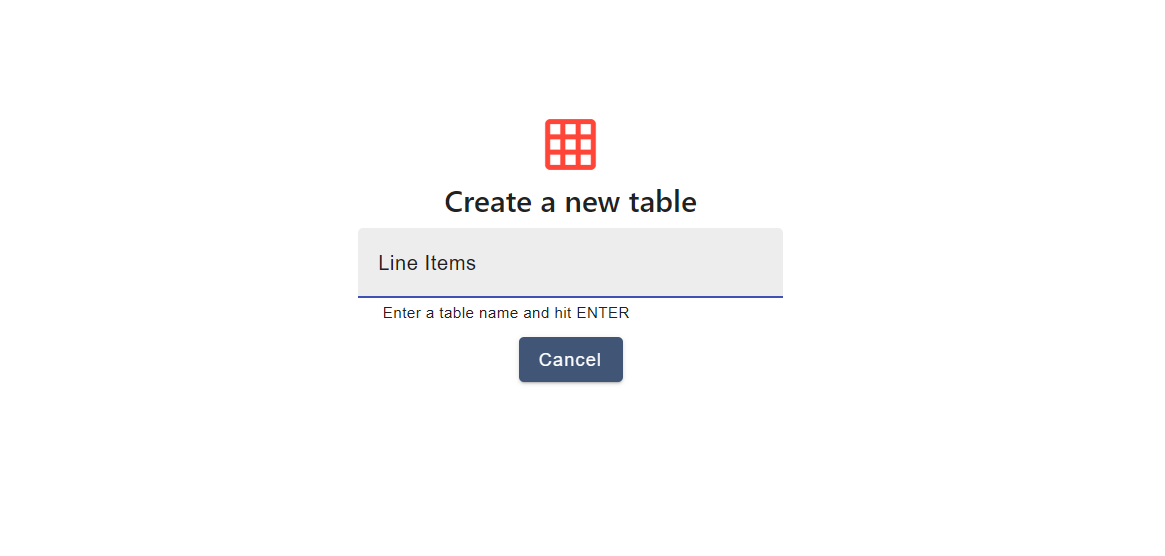
Add Tables
If your documents include tables—for example, invoices, receipts, purchase orders, or rate confirmations—you'll need to define a table, so DocAcquire knows how to extract data from rows of information.
Why "Line Items" for Invoices?
For invoices, tables are often called line items because each row represents a specific product or service listed on the invoice (i.e., a "line" in the document). Line items typically include details like:
- Description
- Quantity
- Unit Price
- Total Price
These details are crucial for understanding the financial breakdown of the invoice.
In contrast, for other document types (e.g., receipts, rate confirmations), we usually refer to tables simply as tables rather than line items, because the rows might represent different kinds of data, not necessarily products or services.
How to Add a Table or Line Items
To configure tables (or line items for invoices):
- Open your selected document type configuration.
- Go to the Tables section.
- Enter a meaningful name for the table that represents the type of data it contains, then press Enter. Example:
- Line Items
- Receipt Items
- Service Charges
- Transaction Details
- Add columns for each data point you want to extract. For a receipt, typical columns might be:
- Description
- Quantity
- Unit Price
- Total Price
- (Optional) Enable Extract Header if your table has a header row you want DocAcquire to capture (e.g., "Item," "Qty," "Amount").
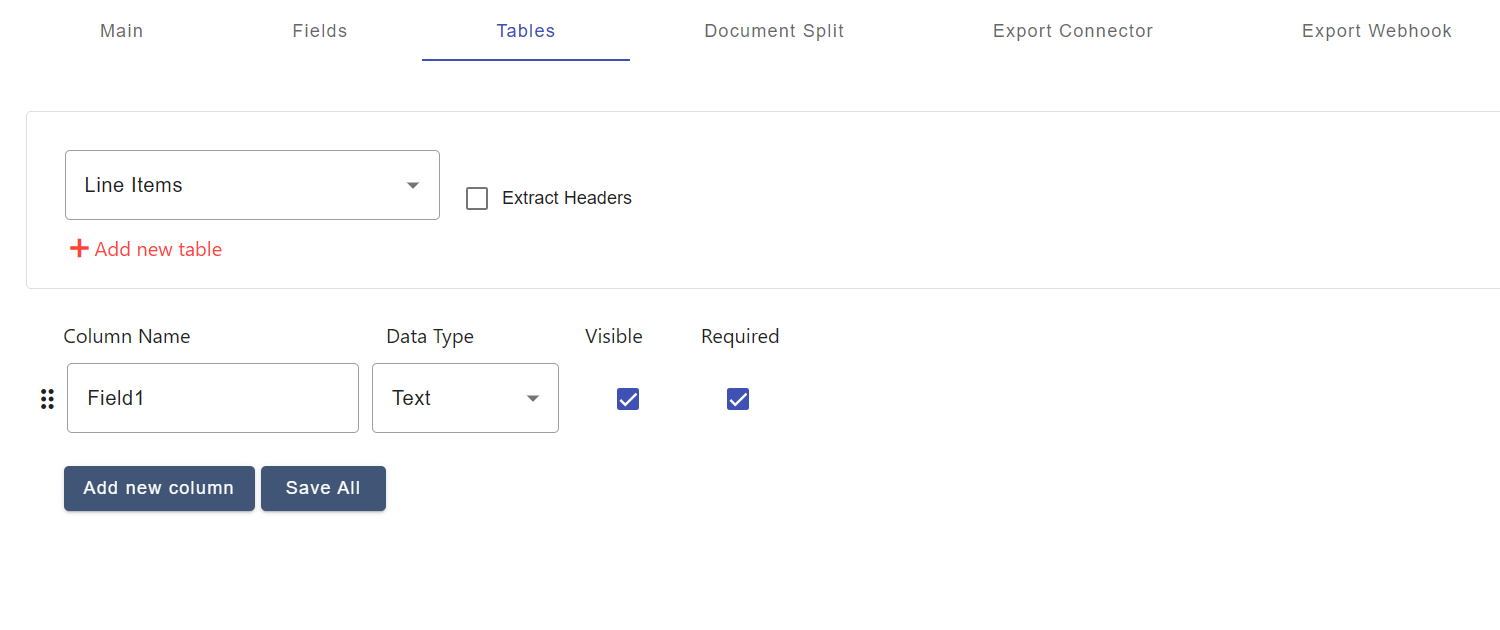
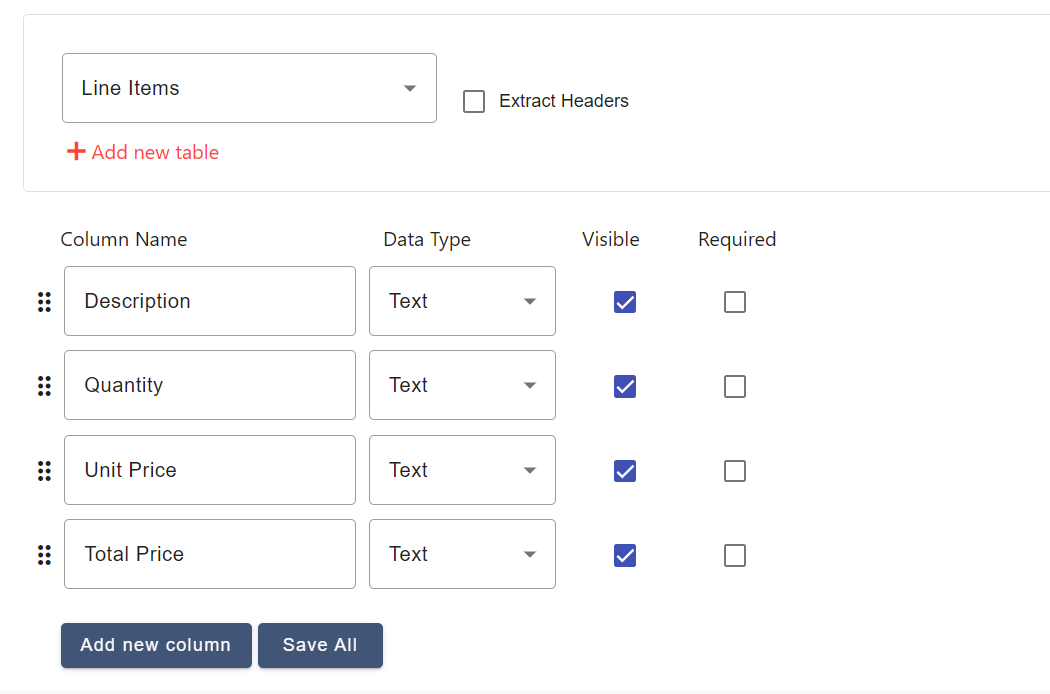
Once you've added all the required columns:
- Review the table structure.
- Click Save All to finalize your table (or line items) setup.
Upload the Document
Once your Document Type and its fields are configured, you're ready to upload documents for processing in DocAcquire.
Note: When you upload documents through the UI, DocAcquire always processes them asynchronously. This means you can continue working in the system while documents are being analyzed in the background.
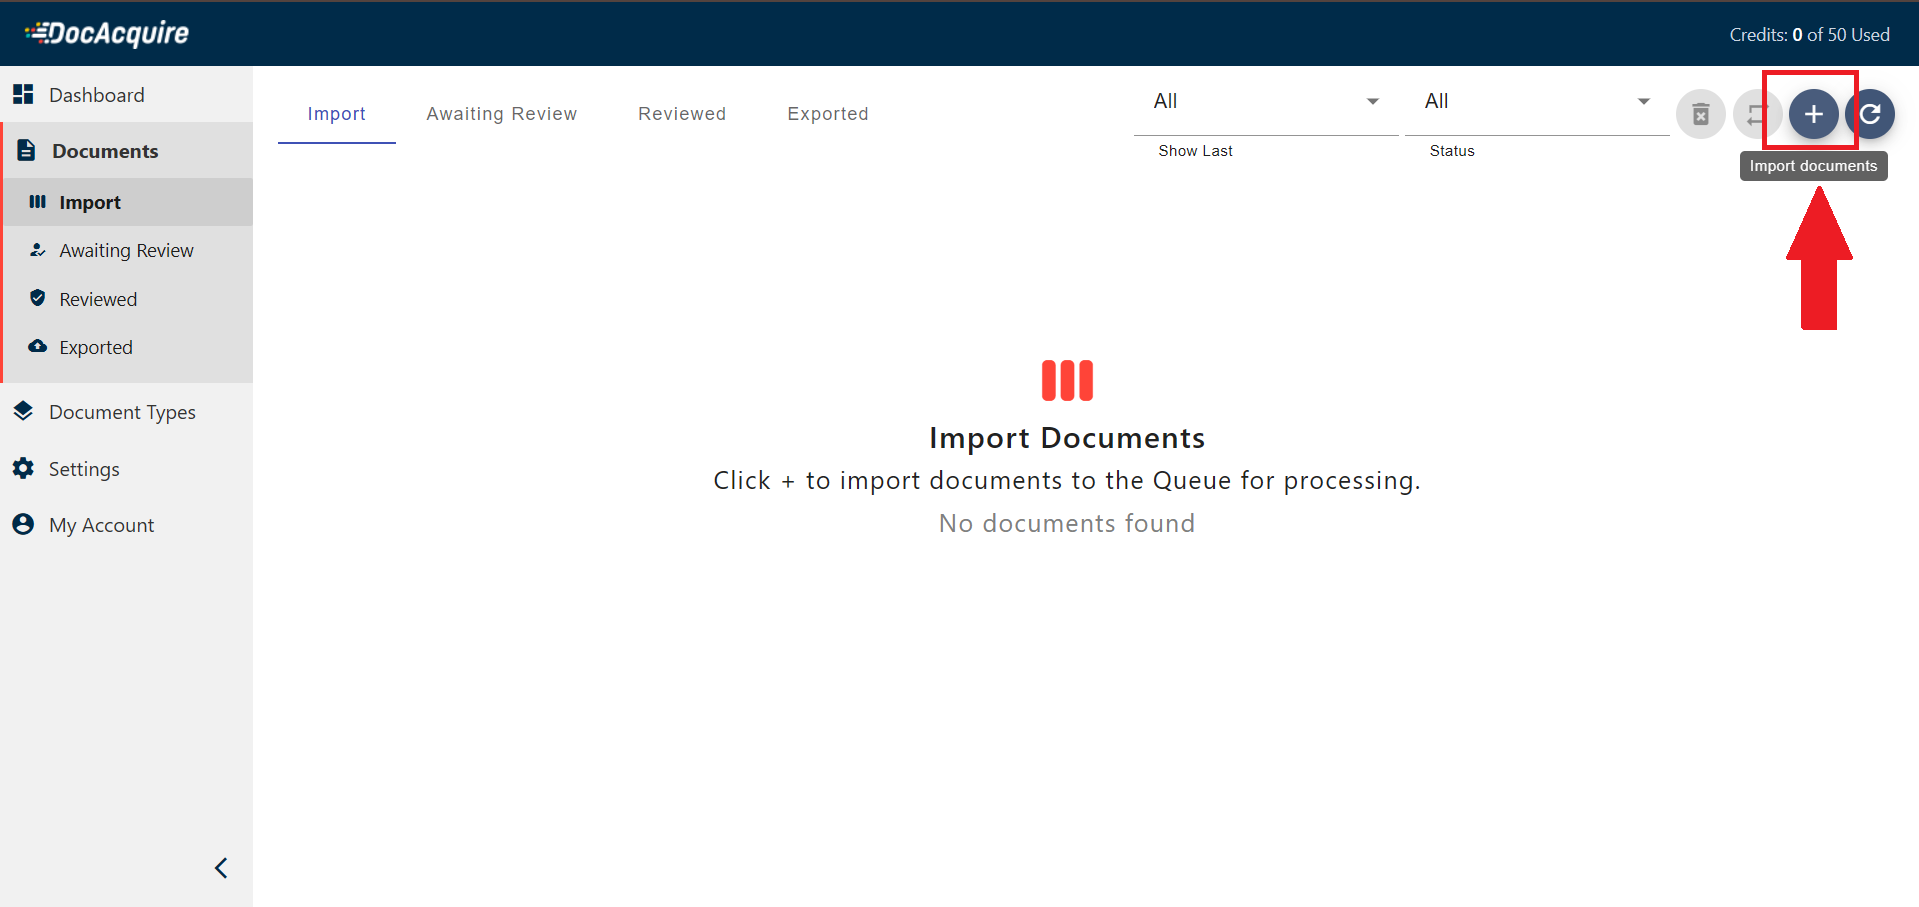
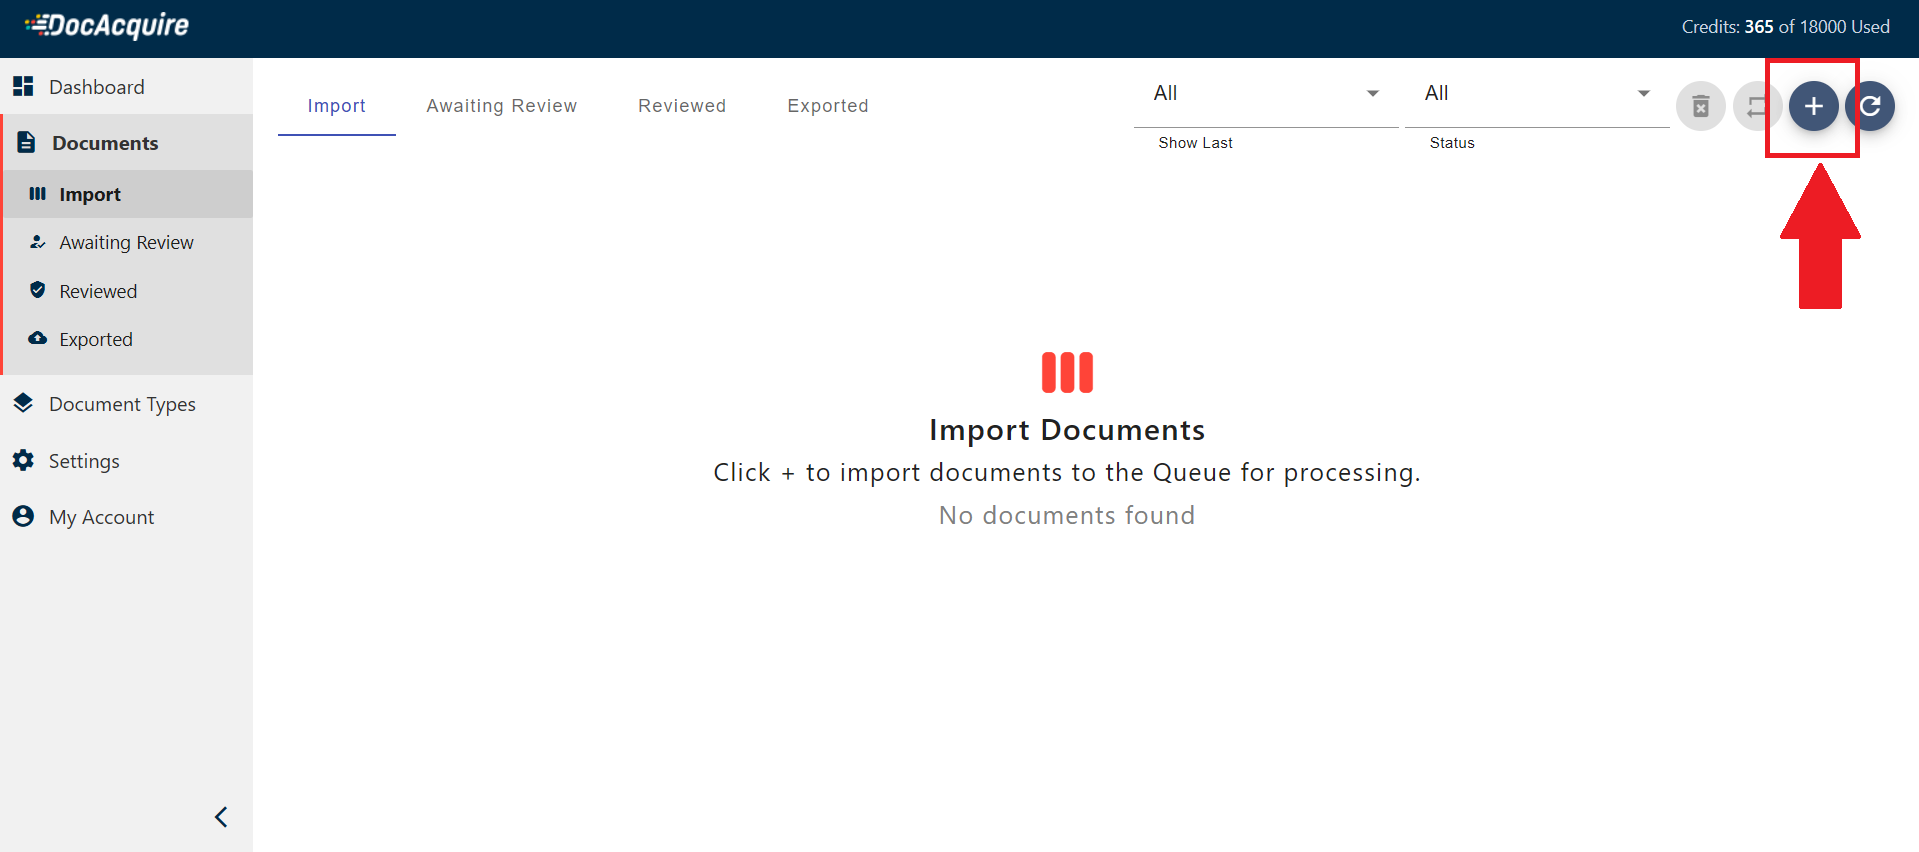
Manual Upload
- Go to the Documents tab from the left sidebar and click the Import Documents button to start the upload process.
- Choose Your Upload Option
Once documents are uploaded to DocAcquire, they go through two important stages: Classification and Splitting.
In both cases, please ensure that the necessary Document Type(s) are created beforehand to enable proper processing.
Classifying Documents
DocAcquire offers two ways to classify documents:
1. Auto Classification – Let DocAcquire Detect the Type Automatically
- You can upload documents without selecting a Document Type.
- DocAcquire will analyze the content and automatically assign the most relevant Document Type.
- This is ideal for:
- Mixed document batches
- When you're not sure about the exact type
- If the matched Document Type includes splitting rules, they will be applied automatically.
- If not, AI Splitting will intelligently detect and split the document into logical sections.
2. Manual Classification – Specify the Document Type(s) Before Uploading
- Before importing, select one or more Document Types.
- The uploaded document will be categorized and processed based on the selected Document Type(s).
- This ensures the document is processed exactly according to how you've configured your fields and tables.
- Splitting is then handled based on the selected Document Type’s rules.
- If no rules are defined, AI Splitting will take over.
Splitting Documents
Splitting allows you to divide a document into smaller parts for focused data extraction. This is useful when:
- A single file contains multiple documents or entities that need to be processed individually
You have two options:
- Split by Rules: Define splitting rules within the Document Type to automatically control how documents are divided.
- AI Splitting (Default): If no rules are defined, DocAcquire will use AI to detect and split based on structure and content.
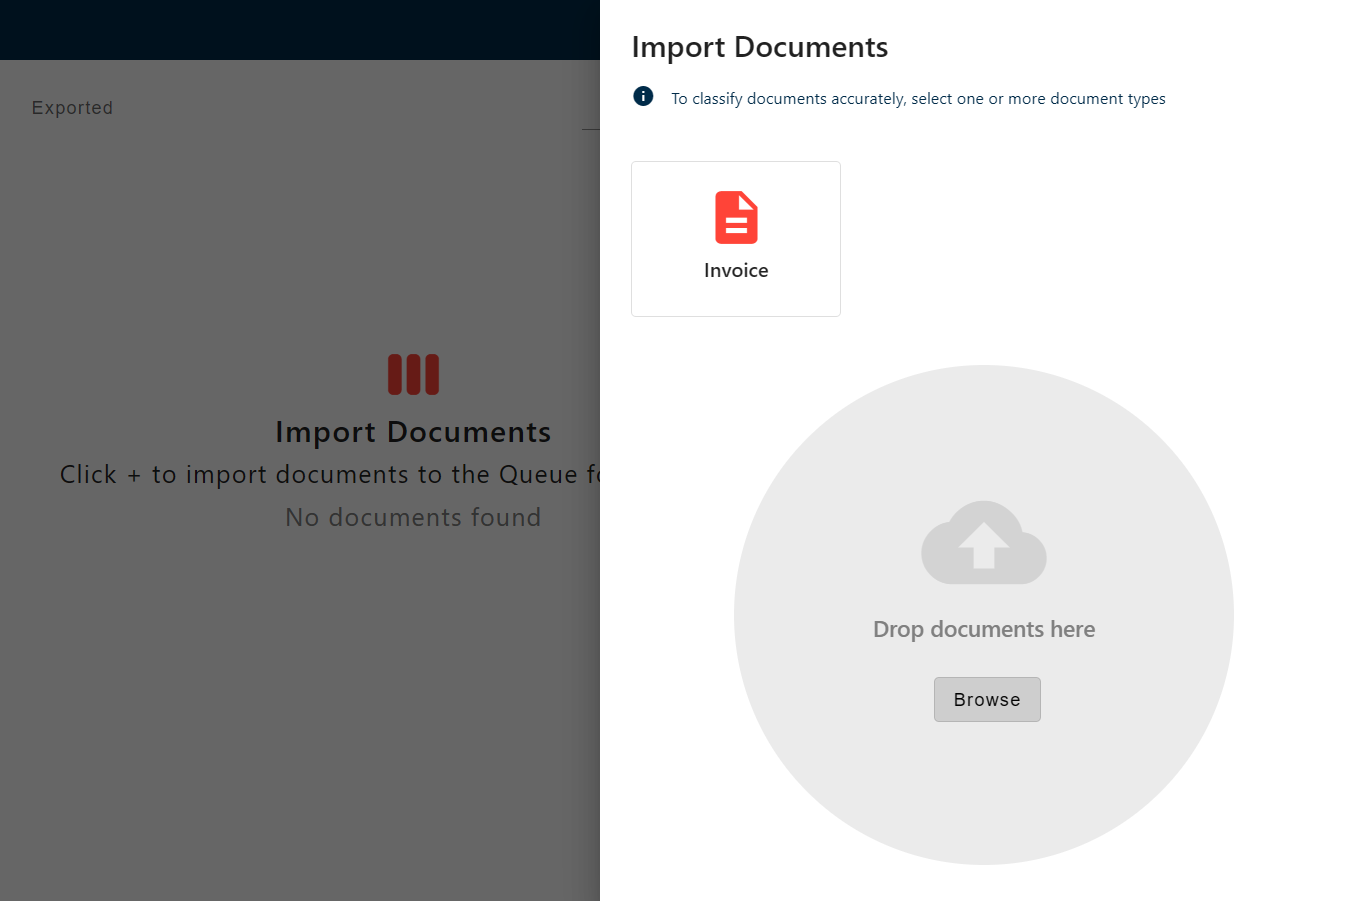
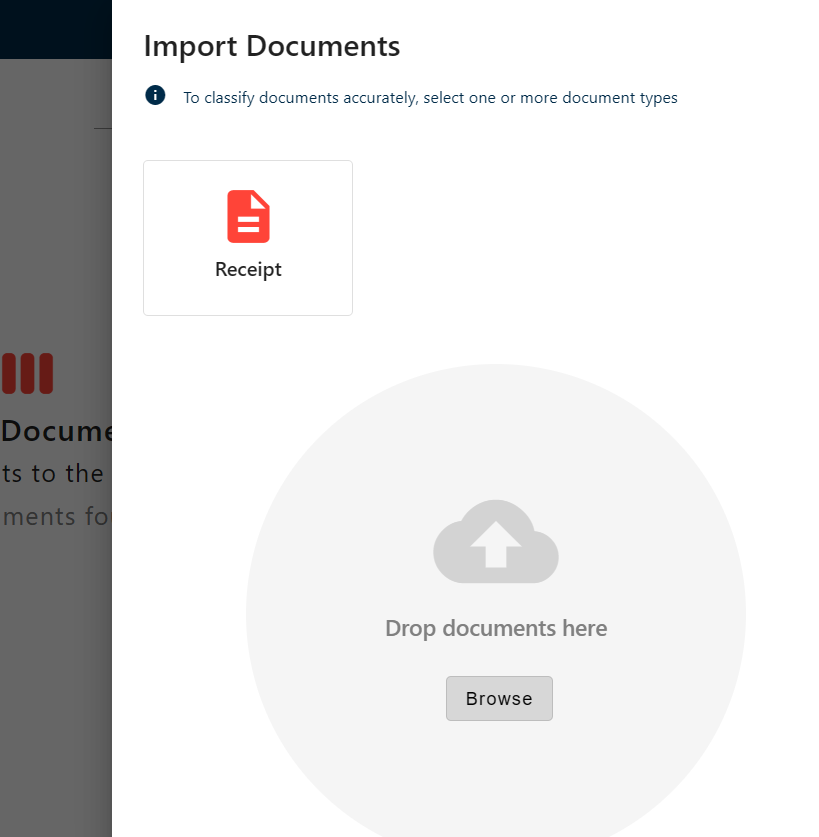
- Click Browse to choose a file from your computer. Supported file formats include:
- JPEG
- JPG
- PNG
- TIFF
- After you select your file, DocAcquire automatically uploads and processes it asynchronously, adding the document to your Documents list and updating its status as processing completes.
API Integration
For automated workflows, you can also upload documents programmatically using DocAcquire's API. This allows you to integrate document processing into your existing systems or applications.
Refer to the API documentation for details on how to upload documents via API.
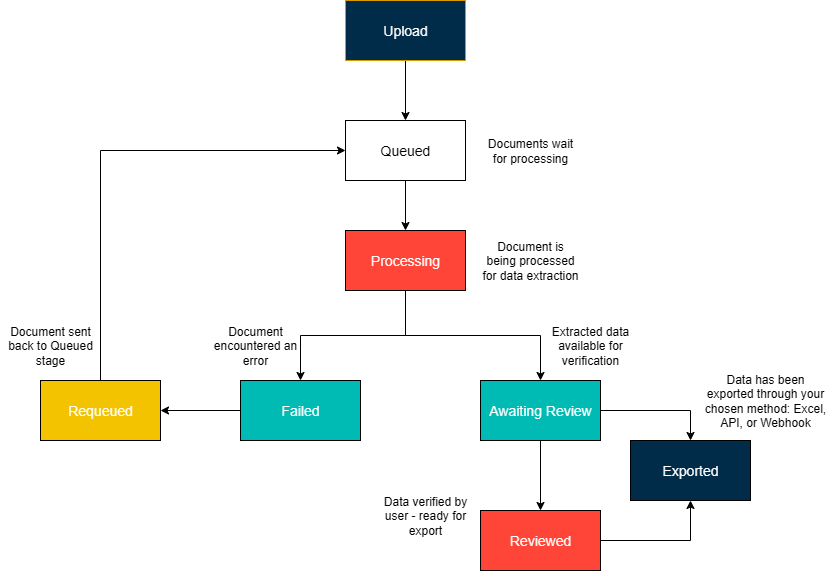
Document Lifecycle Stages in DocAcquire
In DocAcquire, each document follows a well-defined lifecycle, with every stage represented by a specific status. These statuses provide clear visibility into where a document stands in the process, helping you track progress, spot issues quickly, and take timely actions to ensure smooth, accurate, and efficient document processing.
Below is a breakdown of each lifecycle stage and what it means.
1. Queued
Documents in the Queued status are waiting their turn to be processed. This typically occurs when multiple documents are uploaded around the same time, and the system is handling them in sequence based on priority and resource availability.
If the system is already processing other documents, or if there are plan-based or system capacity limits, the newly uploaded document will enter the Queued stage until processing resources become available.
2. Processing
When a document is in the Processing stage, it means DocAcquire is actively working on the document to generate output.
During this stage, the system reads the content, applies your configured rules, and uses AI to extract key information.
3. Awaiting Review
Once data extraction is complete, the document moves to the "Awaiting Review" stage. Here, the extracted data is available for user verification. You can review the values, make any necessary corrections, and confirm accuracy before proceeding.
4. Reviewed
The "Reviewed" status means that the document has been manually verified and all extracted fields have been confirmed by the user. At this stage, the document is considered accurate and ready for the next step—either export or integration into downstream systems.
5. Exported
A document reaches the "Exported" status once it has been successfully sent to the designated output, such as an integration, file export, or API destination. This marks the completion of the document’s lifecycle in DocAcquire.
6. Failed
The "Failed" status indicates that the document encountered an error during processing. This can happen for several reasons:
- No data to extract: The system couldn't find any extractable data (e.g., empty files or unsupported formats).
- Timeout: The document took too long to process (typically more than 10 minutes).
- Corrupt or password-protected file: The system cannot open the document to extract information.
- Extraction error: Internal errors while processing, such as a system crash or extraction logic failure.
In such cases, you can manually retry the document or take corrective action based on the error message.
7. Requeued
When a document encounters an error and enters the Failed stage, you have the option to Requeue it. This moves the document back to the Queued stage, allowing it to go through the processing pipeline again.
Requeuing is useful when:
- Temporary issues (like system load or configuration errors) have been resolved.
- You’ve updated extraction rules or fixed integration issues.
- You want to retry processing without re-uploading the document.
Once requeued, the document follows the standard lifecycle again, starting from the Queued stage and progressing through Processing, Awaiting Review, and beyond.
Summary Table:
| Stage | Meaning |
|---|---|
| Queued | Waiting in line for processing |
| Processing | System works on document to generate output |
| Awaiting Review | Ready for human review and correction |
| Reviewed | Verified and approved by a user |
| Exported | Data successfully sent or exported |
| Failed | Encountered an error; needs attention or retry |
| Requeued | Moved back to Queued for reprocessing |
Document Type Settings
The Document Type Settings section allows you to fine-tune the behavior of each document type according to your business requirements. These settings give you greater control over how documents are processed, reviewed, and exported.
Here's what you can configure:
1. Calculated Fields
Define custom fields whose values are derived from other fields using expressions or formulas. This is useful for generating totals, or any other dynamic value based on existing data.
2. Splitting Rules
Set rules that determine how multi-page documents should be split into individual documents. This is especially helpful for batch uploads or scanned files containing multiple forms or invoices.
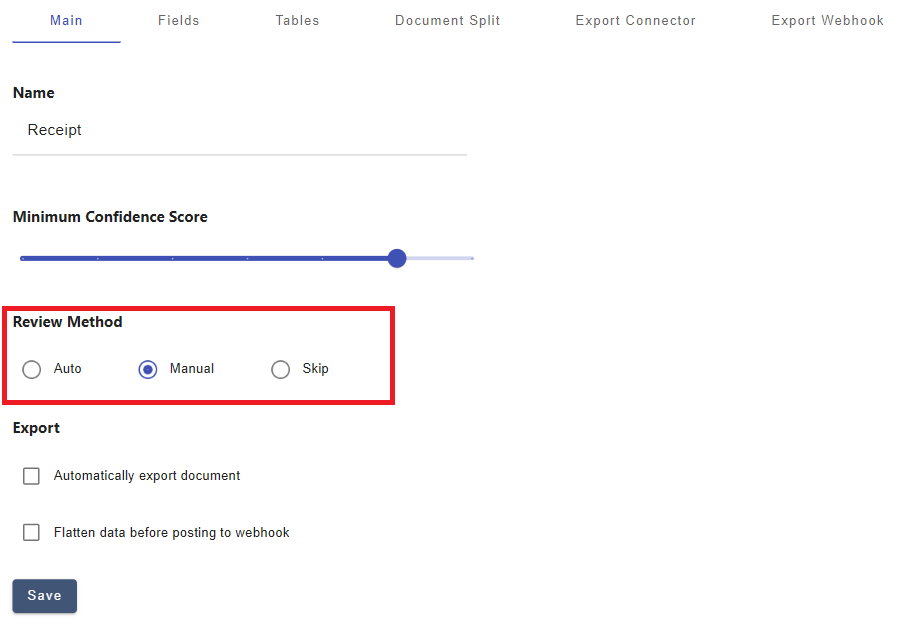
3. Confidence Score Threshold
Set your desired confidence score for data extraction. Documents that achieve a lower score will be flagged for manual review (only if the review method is not set to "SKIP"). This ensures only data above your accuracy standards is processed, helping reduce manual review efforts.
4. Export Options
Configure how and where your data will be exported. You can enable automatic export to your selected destination, and if a webhook is configured, choose to flatten the data into a simple key-value format before it's sent—making it easier to process in external systems.
5. Review Method
Choose how documents should be reviewed after extraction. You can set it to Auto, where documents that meet the confidence score and pass all validations are automatically marked as reviewed. In Manual mode, every document goes through a manual verification process, ensuring human oversight. If you select Skip, the review step is completely bypassed, and documents proceed directly to export.

6. Webhooks
Use webhooks to send real-time updates to your system when key events occur. If auto-export is enabled, the webhook triggers automatically after review; otherwise, it triggers when you manually export the document.
Setup Calculated Field
Calculated Fields allow you to define custom fields whose values are automatically derived from other data fields in a document using formulas or logic. These are useful when you want to automate computations like totals, taxes, or conditional values based on extracted data.
Add a Calculated Field
To add a new calculated field to a Document Type:
- Select the document type where you want to define the calculated field.
- In the selected document type, go to the Fields tab. This section lists all fields associated with the document type.
- The calculated field logic can only be applied to fields with the Data Type set to Number.
- If you haven't already created the field:
- Click "Add new field"
- Set the Data Type to Number
- Click "Save All"
- If the field already exists, make sure its data type is set to Number before continuing.
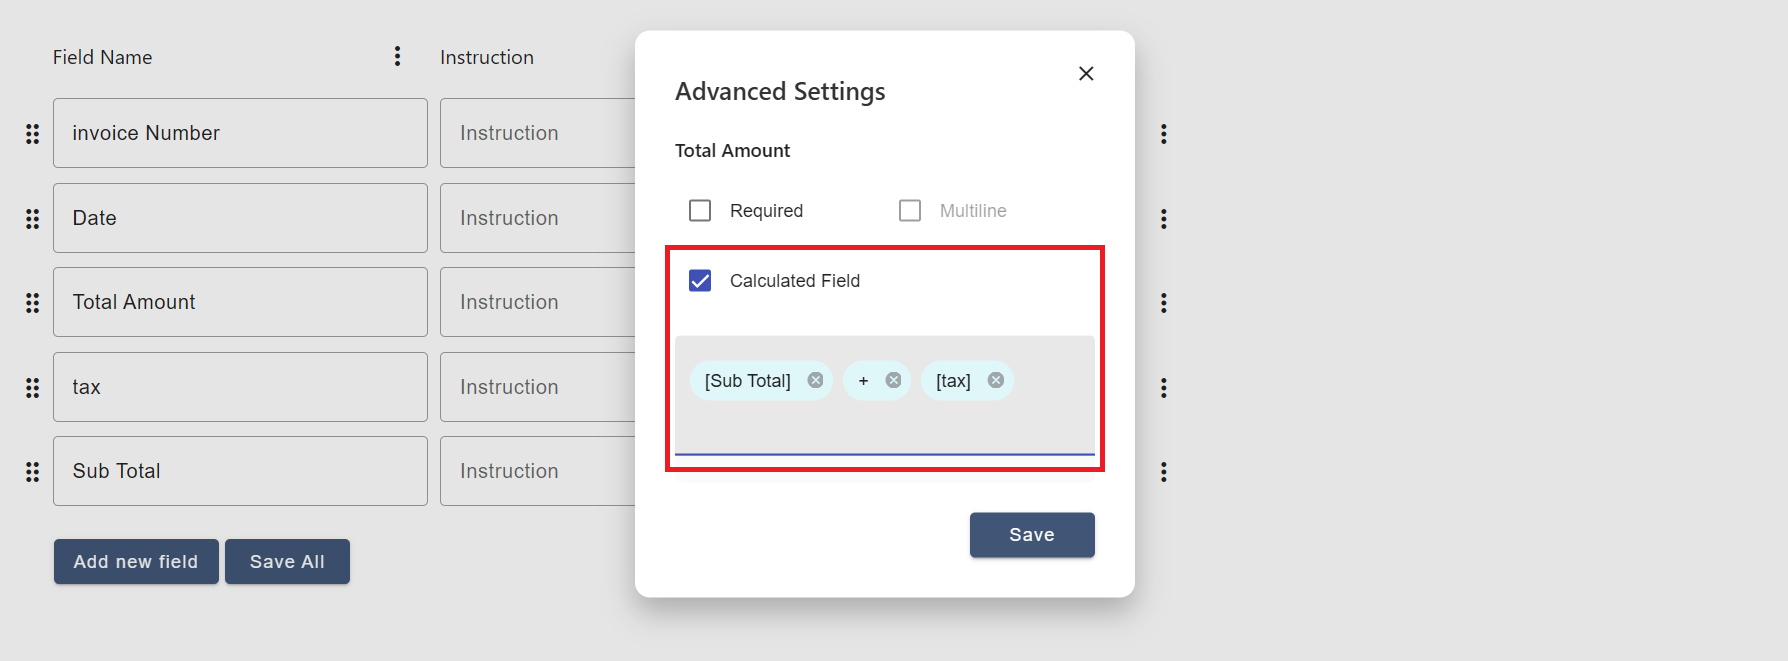
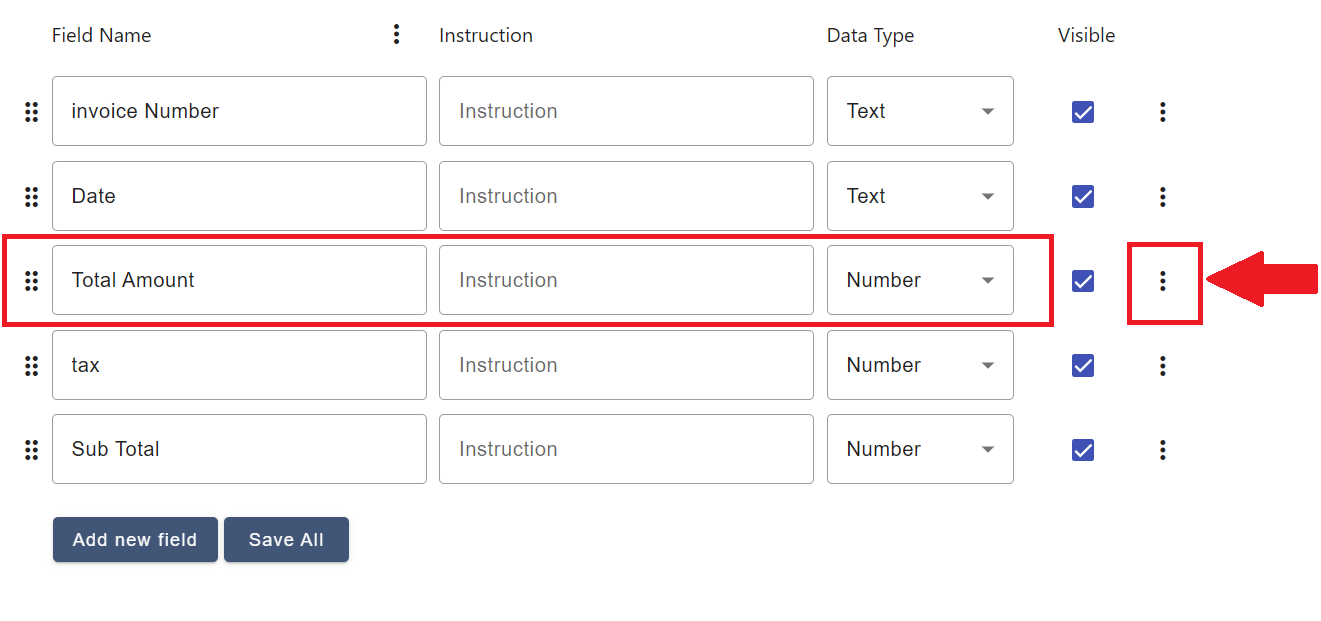
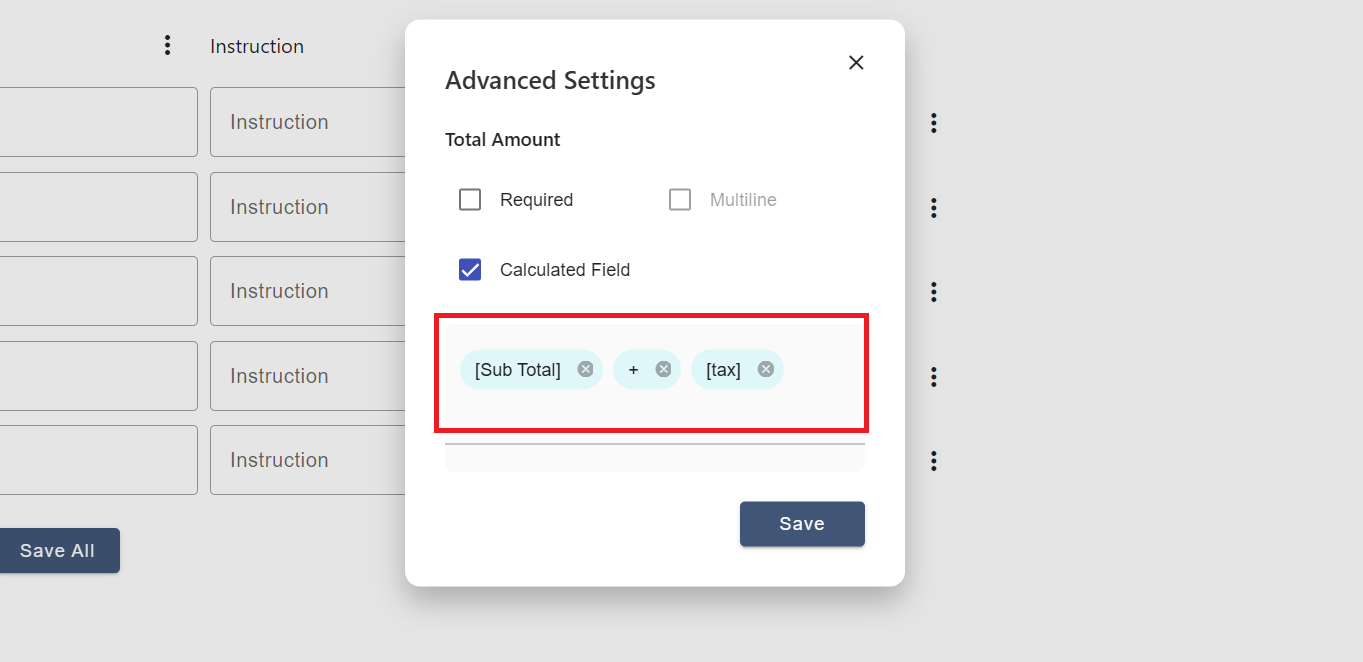
- Locate the field you want to turn into a calculated field. Click the three-dot menu next to the field. The Advanced Settings panel will appear.
- In the Advanced Settings panel:
- Enable the Calculated Field option.
- Click inside the Formula input box. A dropdown will appear showing all fields with Data Type set to Number.
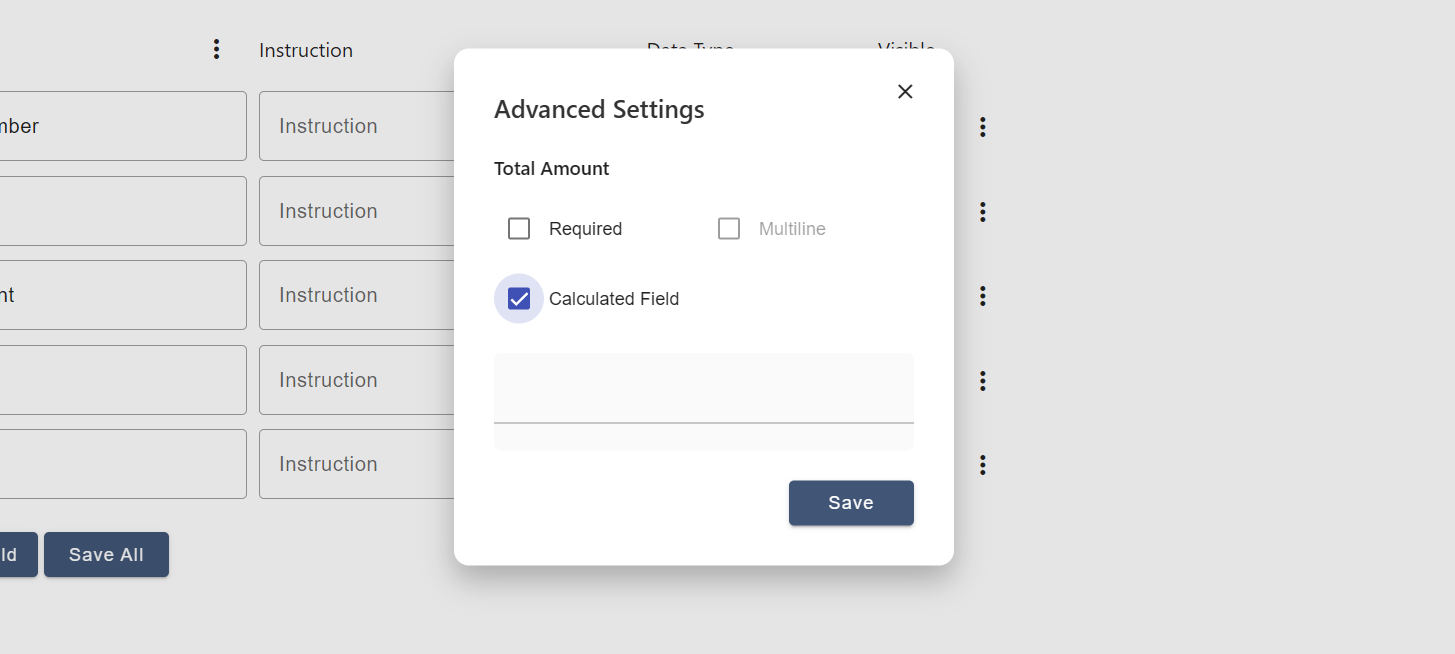
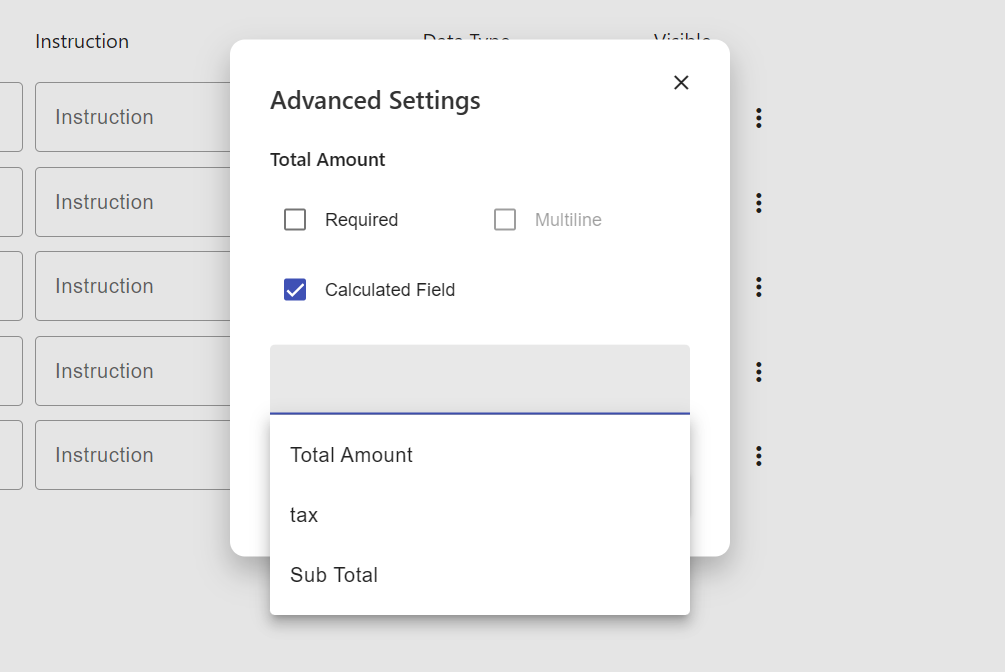
- Select fields from this dropdown to build your formula easily—no need to type field references manually; they will be inserted automatically in the correct format.
- Example of formulas:
- Simple addition: [Subtotal] + [Tax]
- Click Save to apply the formula. The field will now automatically compute its value based on the formula every time a document is processed.
Setup Splitting Rules
Splitting rules in DocAcquire helps break down multi-page files into individual documents for accurate processing. This is essential when a single file contains multiple logical documents—such as a batch of invoices, purchase orders, or forms.
You can set up these rules within each Document Type to instruct DocAcquire where and how to separate documents.
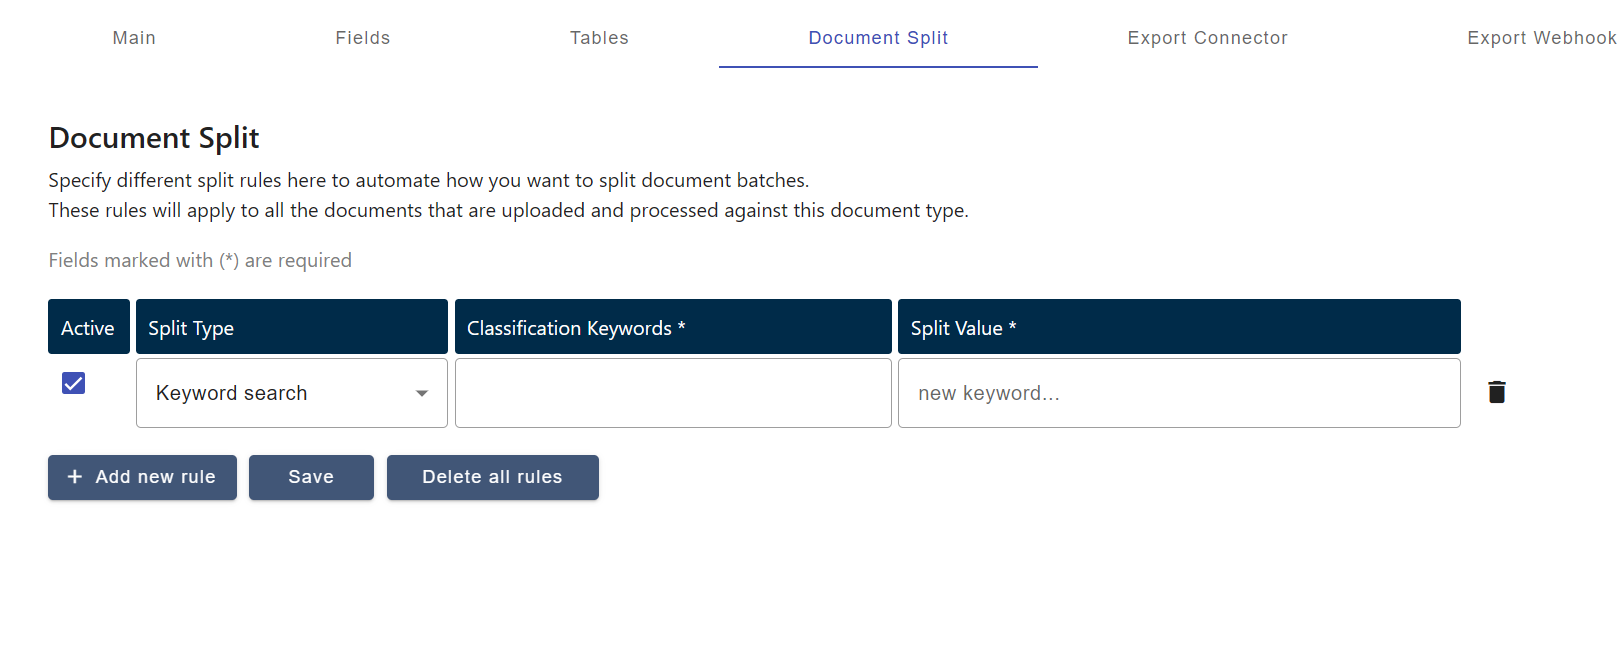
Configure Splitting Rules
To set up splitting rules for a Document Type in DocAcquire:
- Go to Document Types and select the document type you want to configure.
- In the selected document type, go to the Document Split Settings section.
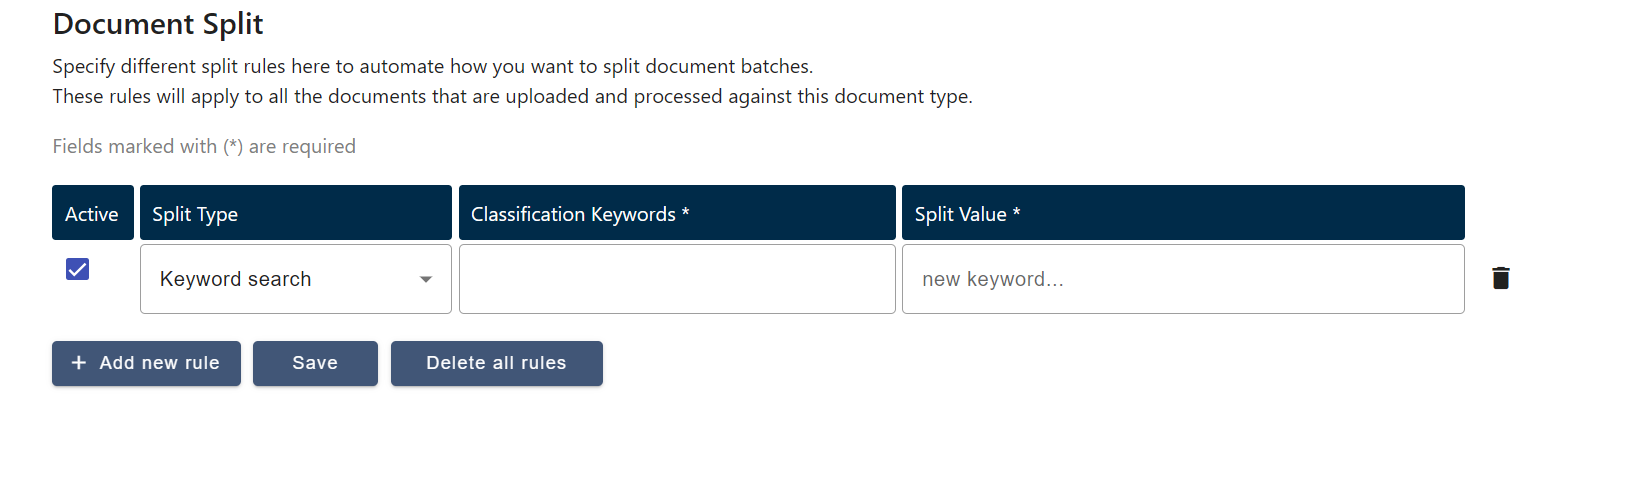
- Choose your preferred splitting rule:
- Page Count - Set how many pages each split should include (e.g., split every 1 page).
- Keyword Search - Splits the content based on one or more keywords or phrases that act as markers. (e.g., If you add "page 1 of 1" and "invoice#" as keywords, the document will split at each occurrence of either phrase.)
- Unique Field Value - Splits data based on the unique values of a specific field. (e.g., If using the "Customer ID" field, the content will be split into separate sections for each unique customer.)
- Define Classification Keywords (Required)
You must define classification keywords to ensure accurate document splitting. These are specific words or phrases commonly found at the beginning of a new document—such as "Tax Invoice", "Debit Note", or "Purchase Order". DocAcquire uses these keywords as a mandatory condition to confirm the start of a new document, especially when the document structure is inconsistent or varies between pages.
Including classification keywords helps prevent incorrect splits and ensures the system correctly identifies where each document begins.
- Click Save to apply your selected splitting method and classification keywords to the document type.
Fallback to Auto Splitting
If no splitting rules are defined for a Document Type, DocAcquire automatically applies AI-powered Auto Splitting.
This method uses intelligent layout and content analysis to detect document boundaries—ideal for mixed or unpredictable formats. Auto Splitting works in the background without manual setup, ensuring seamless processing for varied document types.
Setup Confidence Score
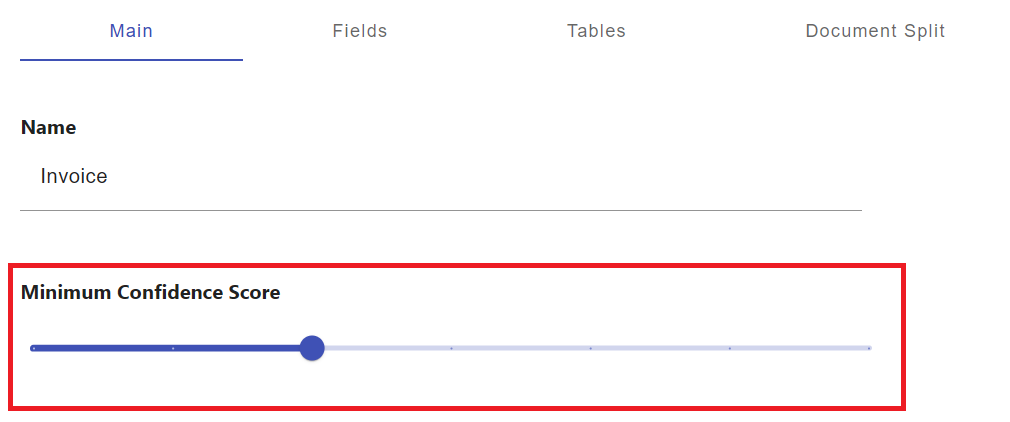
The Confidence Score Threshold in DocAcquire allows you to set a minimum confidence level required for extracted data to be considered reliable. Confidence scores represent how sure the system is about the accuracy of each extracted value, based on the underlying AI and extraction logic.
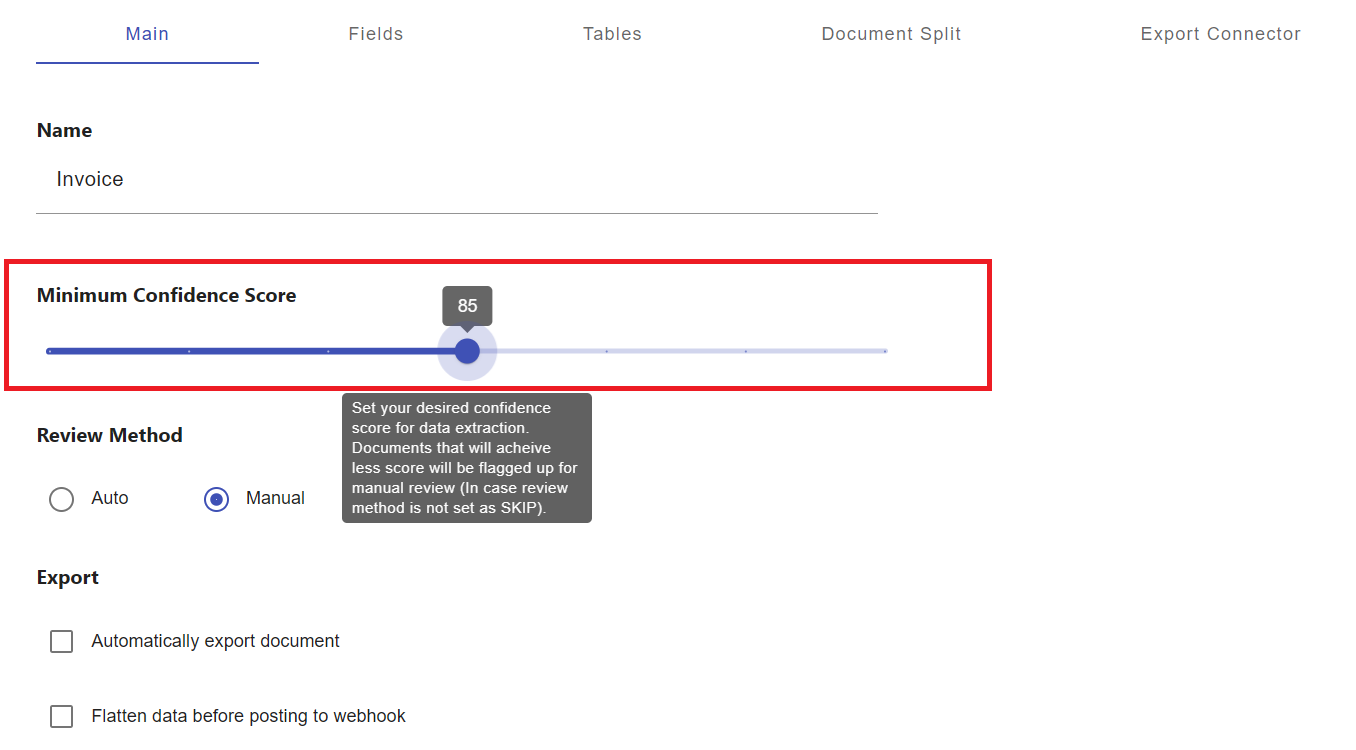
By setting a threshold, you can automatically flag any document where extracted values fall below the acceptable confidence level—ensuring that such documents are sent for manual review instead of being exported with potentially incorrect data.
This is particularly useful in maintaining high data accuracy, especially in business-critical processes like invoicing, compliance, or legal documentation.
How It Works
- Threshold Setting: You can configure a confidence score threshold (e.g., 80%, 90%) to define how strict your data validation process should be. This threshold represents the minimum confidence level required for extracted data to be accepted without manual intervention.
- Manual Review Trigger: If any required field has a confidence score below the defined threshold, and the Review Method is not set to "SKIP", the document will be flagged for manual review. This ensures that potentially inaccurate data is reviewed by a human before proceeding.
- Visual Indicators:
- Fields with low confidence scores (below the threshold) are marked with a blood orange tick, helping users quickly identify values that may need attention.
- Fields with high confidence scores (meeting or exceeding the threshold) are marked with a robin’s egg blue tick, indicating the data is accurate and does not require manual review.
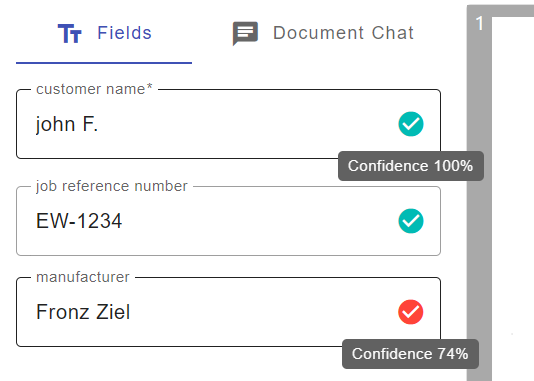
This color-coded feedback system allows reviewers to easily distinguish between fields that need verification and those that can be trusted.
By leveraging confidence scores, you can strike the right balance between automation and accuracy—ensuring only high-confidence data is exported automatically, while low-confidence data is flagged for further validation.
Configure Document Verification
Once you've set up your Document Type with fields and tables, the next step is to decide how you want DocAcquire to verify documents after they're processed.
Verification ensures that the data extracted from your documents is accurate and meets your business rules before it's marked as complete and ready for export or integration.
DocAcquire offers three options for document verification: Auto, Manual and Skip
To configure your verification method:
- Go to the Document Type configuration page.
- Scroll down to the "Review Method" section.
- Select your preferred Review method (Auto, Manual, or Skip).
- Click "Save" to apply your changes.
Auto Review
- How it works: DocAcquire automatically checks the extracted data against validation rules you've defined (e.g., mandatory fields must not be empty; numerical fields fall within expected ranges). If a document meets the required confidence score and passes all the validation checks, it will be considered accurate without needing manual review.
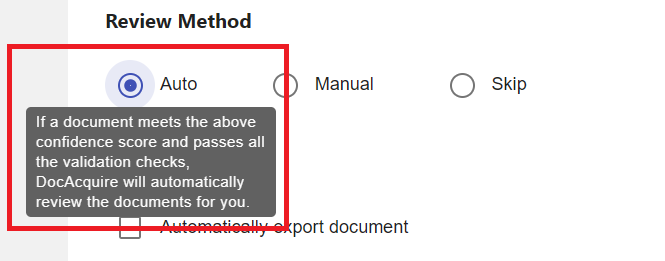
- When to use it: Ideal for high-volume, highly standardized documents where AI accuracy is consistently high, and you want to save time on manual review.
- What happens next: If a document meets the required confidence score and passes all the validation checks, it automatically moves to the "Reviewed" stage, ready for export or further processing.
Manual Review
- How it works: After extraction, the document is queued for human review. A user opens the document in the UI, inspects the extracted fields and tables, makes corrections if needed, and manually marks it as Reviewed.
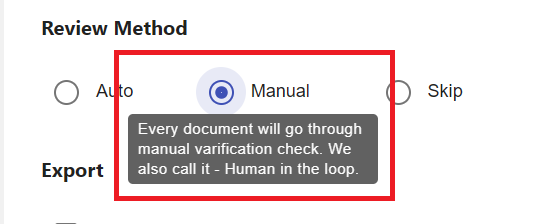
- When to use it: Suitable for critical documents where accuracy is crucial (e.g., contracts, high-value invoices) or when document formats vary greatly, making automated validation less reliable.
- What happens next: Once reviewed and approved, the document moves to the "Reviewed" stage.
Skip Review
- How it works: Documents bypass all validation checks and manual review, and DocAcquire automatically considers them as "Reviewed."
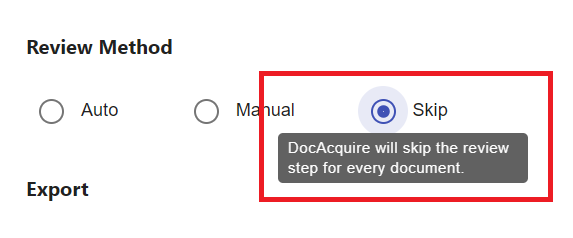
- When to use it: Use with caution, only for low-risk documents or workflows where speed is more important than strict validation.
- What happens next: Documents are immediately marked as Reviewed, ready for export or integration.
Your Document Type is now fully configured and ready for document processing according to your chosen verification method!
Auto Review
How it works:
- DocAcquire automatically checks the extracted data against validation rules you've defined (e.g., mandatory fields must not be empty; numerical fields fall within expected ranges). If a document meets the required confidence score and passes all the validation checks, it will be considered accurate without needing manual review.
When to use it:
- When documents follow consistent formats.
- When you trust DocAcquire's extraction and want to save time on manual review.
What happens next:
- If a document meets the required confidence score and passes all the validation checks, it automatically moves to the "Reviewed" stage, ready for export or further processing.
Manual Review
How it works:
- After extraction, the document is queued for human review. A user opens the document in the UI, inspects the extracted fields and tables, makes corrections if needed, and manually marks it as Reviewed.
When to use it:
- For critical documents where accuracy is crucial (e.g., contracts, high-value invoices).
- When document formats vary greatly, automated validation is less reliable.
What happens next:
- Once reviewed and approved, the document moves to the "Reviewed" stage.
Skip Review
How it works:
- Documents bypass all validation checks and manual review, and DocAcquire automatically considers them as "Reviewed."
When to use it:
- When dealing with low-risk documents.
- For workflows where speed is more important than strict validation.
What happens next:
- Documents are immediately marked as Reviewed, ready for export or integration.
After selecting your preferred Review Method:
- Click Save to apply your settings.
Your Document Type is now fully configured and ready for document processing according to your chosen verification method!
Auto Splitting
Auto Splitting in DocAcquire uses artificial intelligence (AI) to automatically detect where one document ends and another begins—without requiring manual setup or predefined rules.
This intelligent method is ideal for processing documents that differ in layout, length, or structure—such as mixed batches of invoices, forms, or statements—where consistent patterns are hard to define.
Unlike fixed-rule approaches, Auto Splitting “reads” and interprets documents much like a human would, identifying logical breaks based on layout, content, and context.
How Auto Splitting Works
DocAcquire’s AI-powered Auto Splitting engine intelligently analyzes each document page to determine logical breakpoints, using a multi-layered approach that mimics human-like interpretation. This ensures highly accurate and efficient document separation, even in complex or variable formats.
- Structural Layout Recognition: Auto Splitting begins by examining the visual layout of each page. It identifies structural components such as headers, footers, titles, section breaks, and tables.This allows the system to recognize the beginning and end of documents based on how information is visually presented—regardless of differences in formatting across pages.
Even when documents lack consistent templates, the AI can detect layout patterns and segment pages accordingly. - Content-Aware Understanding: Beyond surface-level keywords, the AI evaluates the actual meaning and context of the text. It can intelligently detect key document features—like invoice numbers, purchase order references, customer IDs, or dates—even when they appear in different positions across pages.
By understanding the semantics of the content, DocAcquire ensures accurate separation based on context rather than relying solely on predefined words or static positions. - Cross-Page Continuity Detection: The system also analyzes how content flows between pages. It can determine when information continues from one page to the next—such as multi-page invoices or reports—and when a new, independent document begins.
This capability helps prevent premature or incorrect splits that could otherwise separate pages belonging to the same document.
When to Use Auto Splitting
Use Auto Splitting when:
- Documents have inconsistent layouts or structures.
- You're processing mixed batches with different document types.
- You want to save time by reducing manual rule setup.
- You're handling large-scale document processing with high variability.
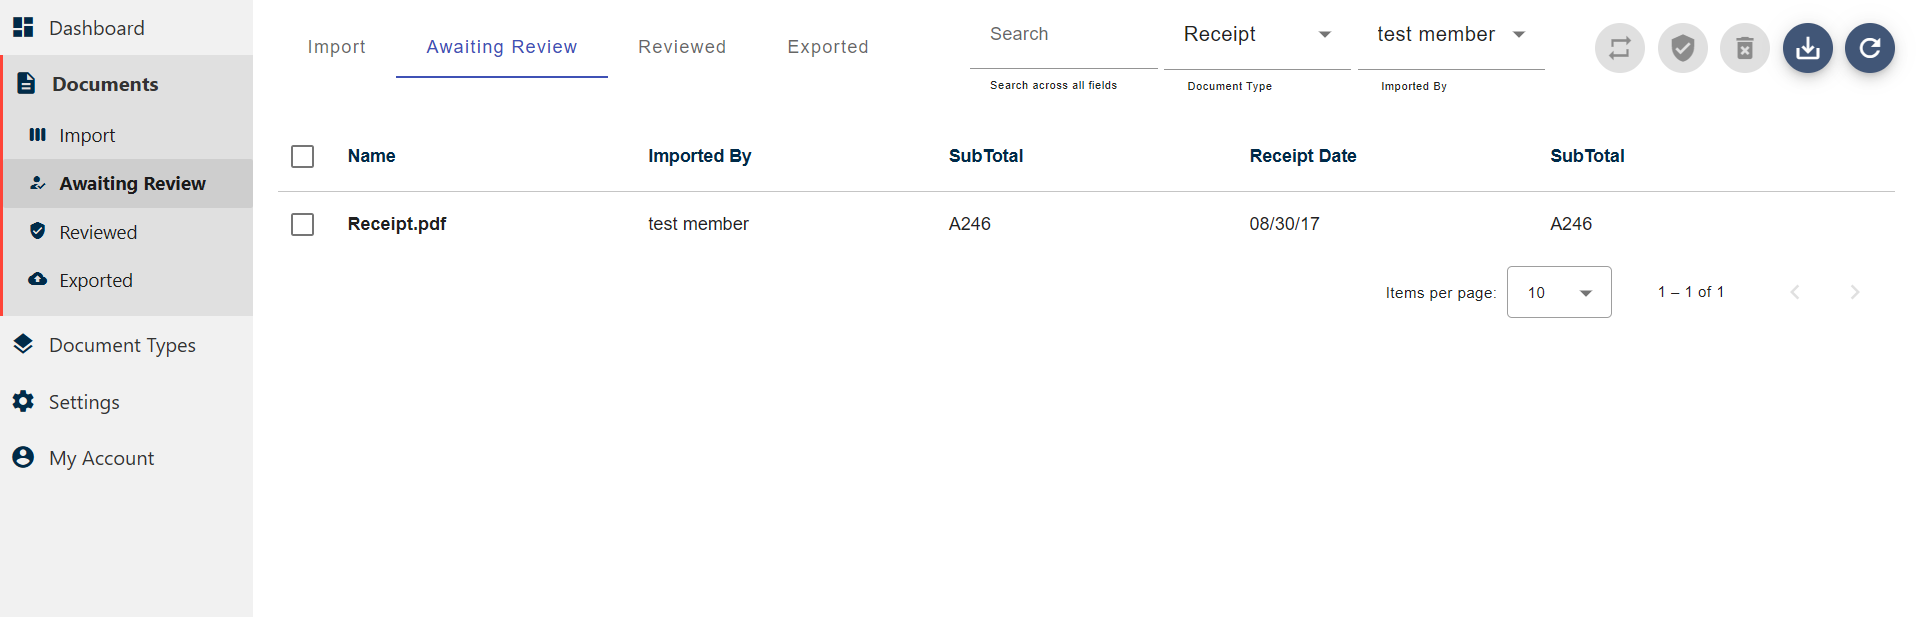
Review Documents and Mark as Reviewed
The Review Screen is a critical component of DocAcquire, allowing human-in-the-loop validation to ensure the highest data accuracy. This step is particularly relevant for documents configured for "Manual Review" or those that failed "Auto Review."
- Accessing the Review Screen:
- Documents that require human verification will appear in the "Awaiting Review" tab within the document section.
- Click on a document to open it in the Review Screen.
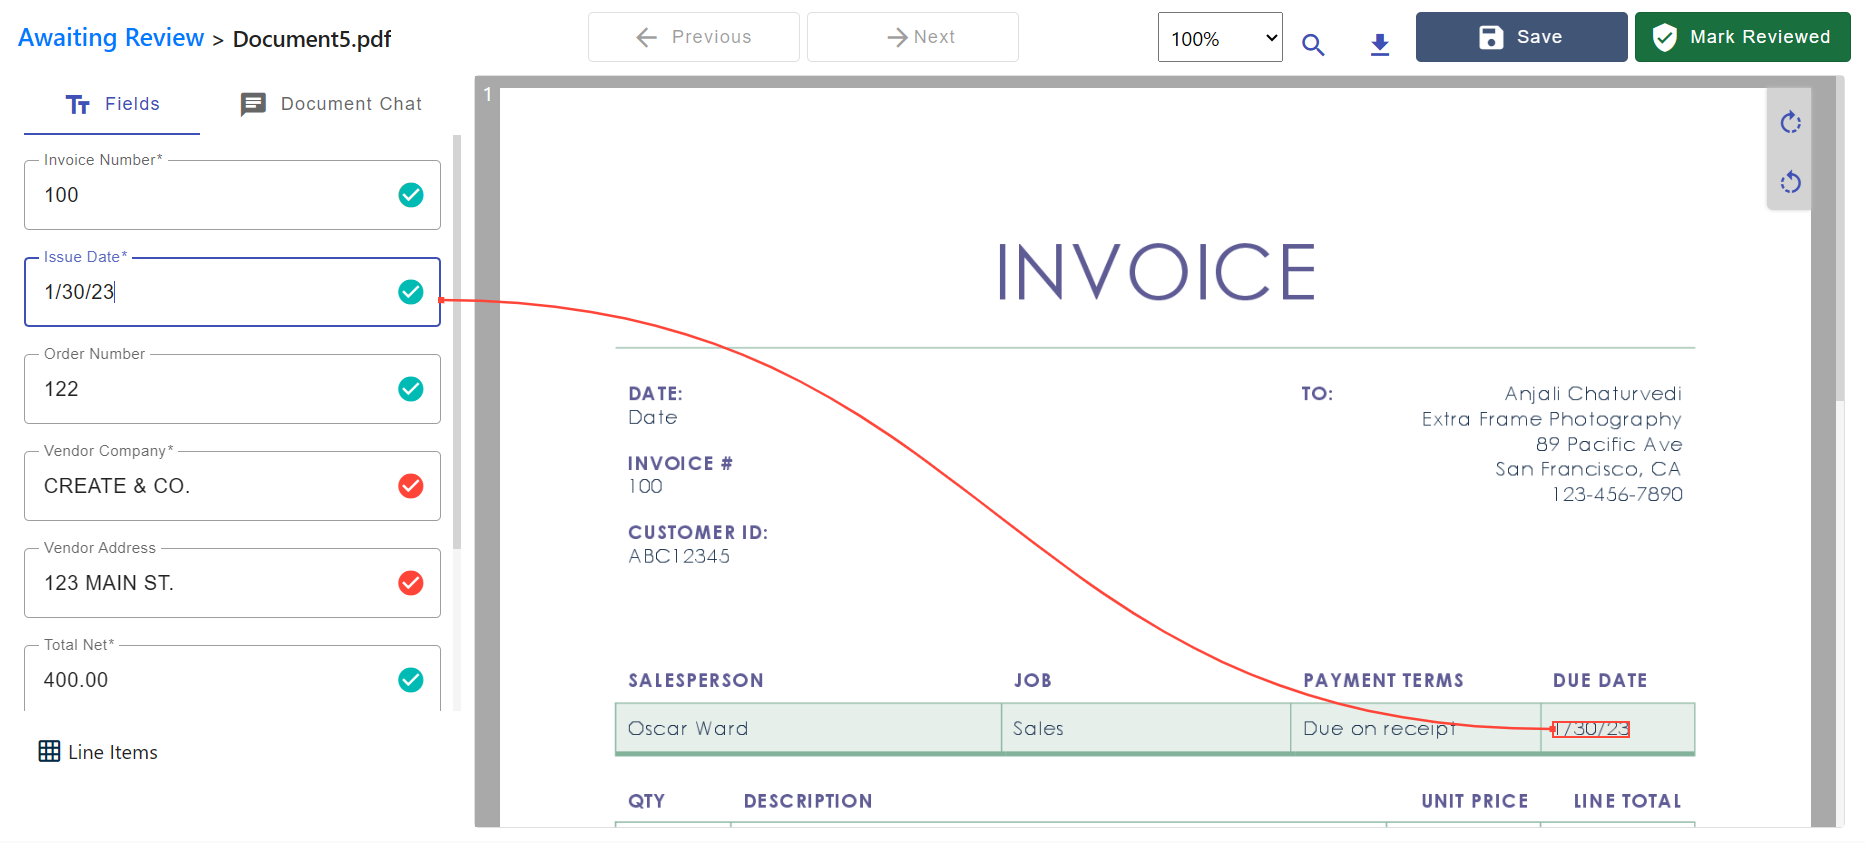
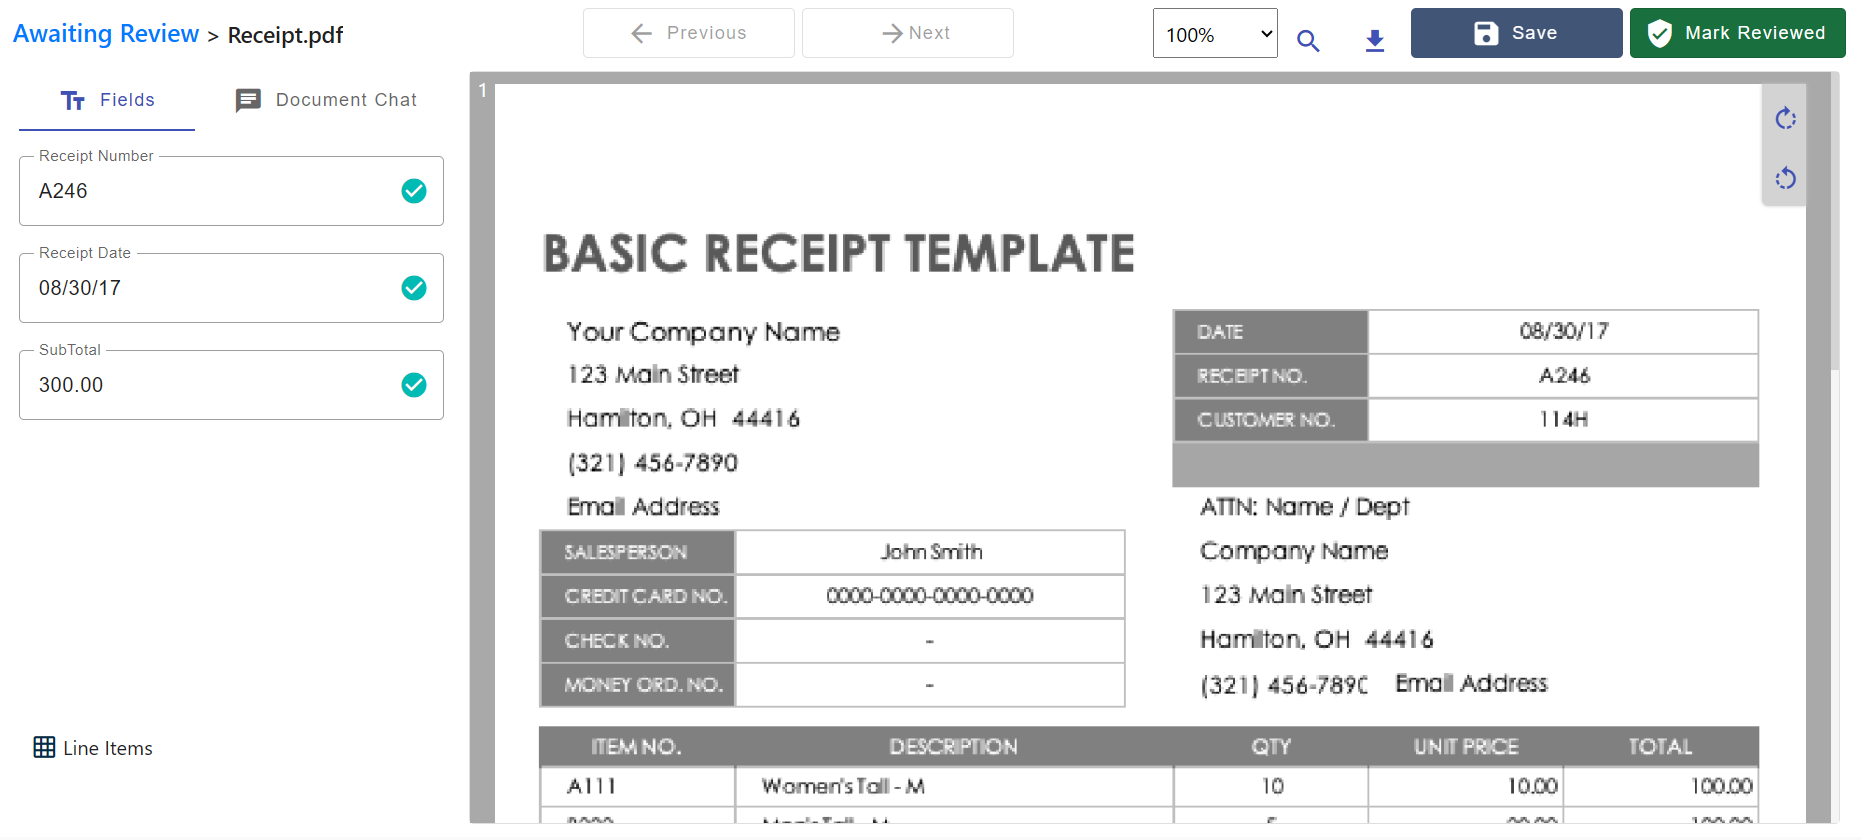
- Understanding the Review Screen:
- The screen is split into two main sections: the document image on one side and the extracted data fields on the other.
- Interactive Bounding Boxes: As you click on a data field, DocAcquire highlights the corresponding area on the document image with a bounding box. You can adjust these boxes or click on new areas to correct or add data.
- Data Fields: Review the extracted values for each defined field. If an extraction is incorrect or missing, simply type in the correct value.
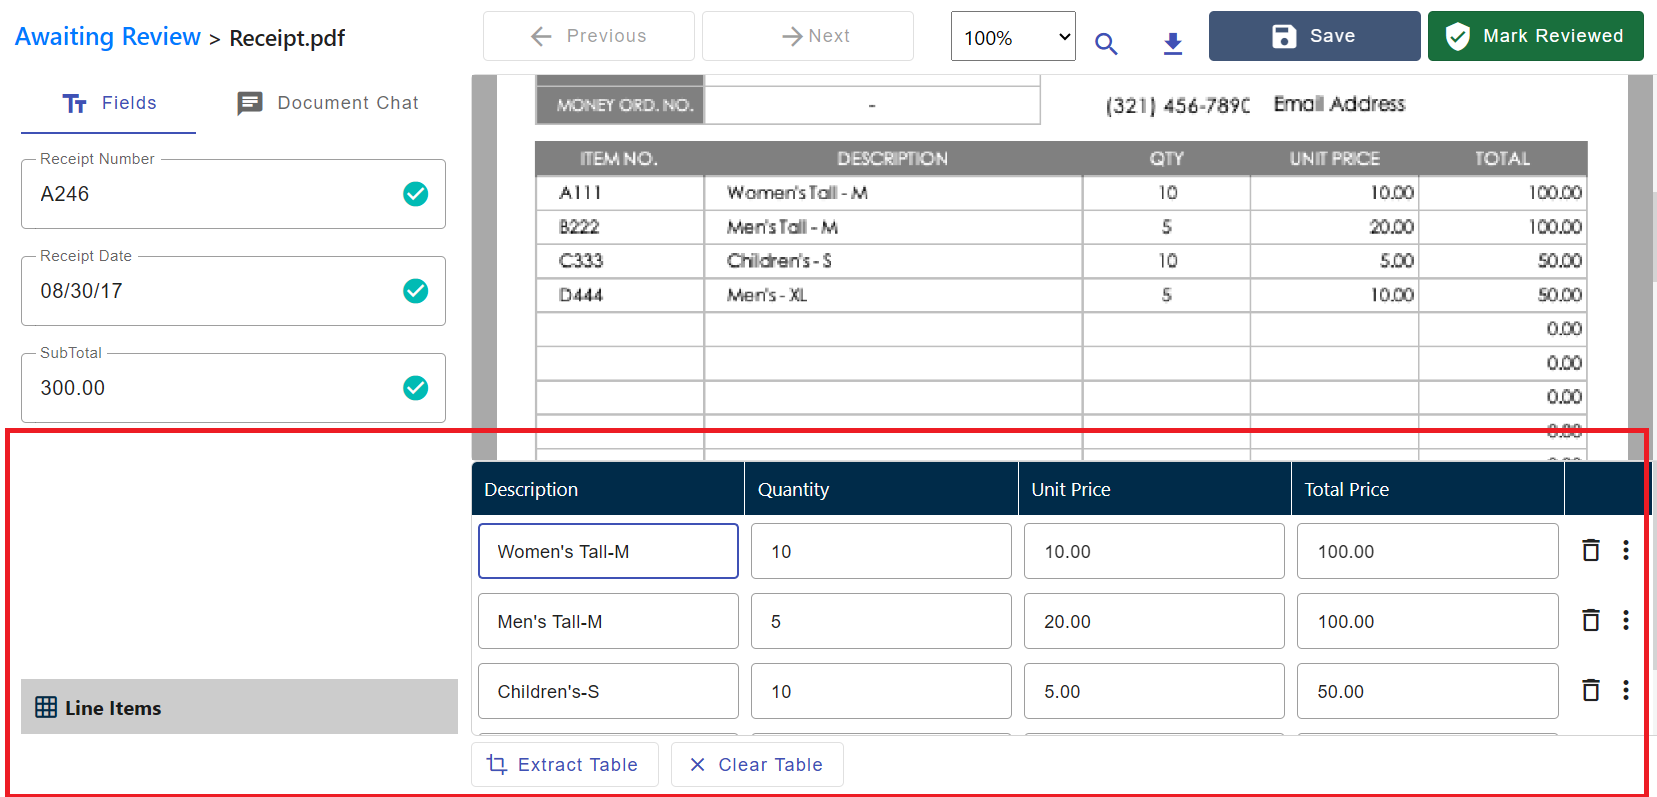
- Table Extraction: For documents with tables, DocAcquire presents the extracted table in a structured format. You can easily add, edit, or delete rows.
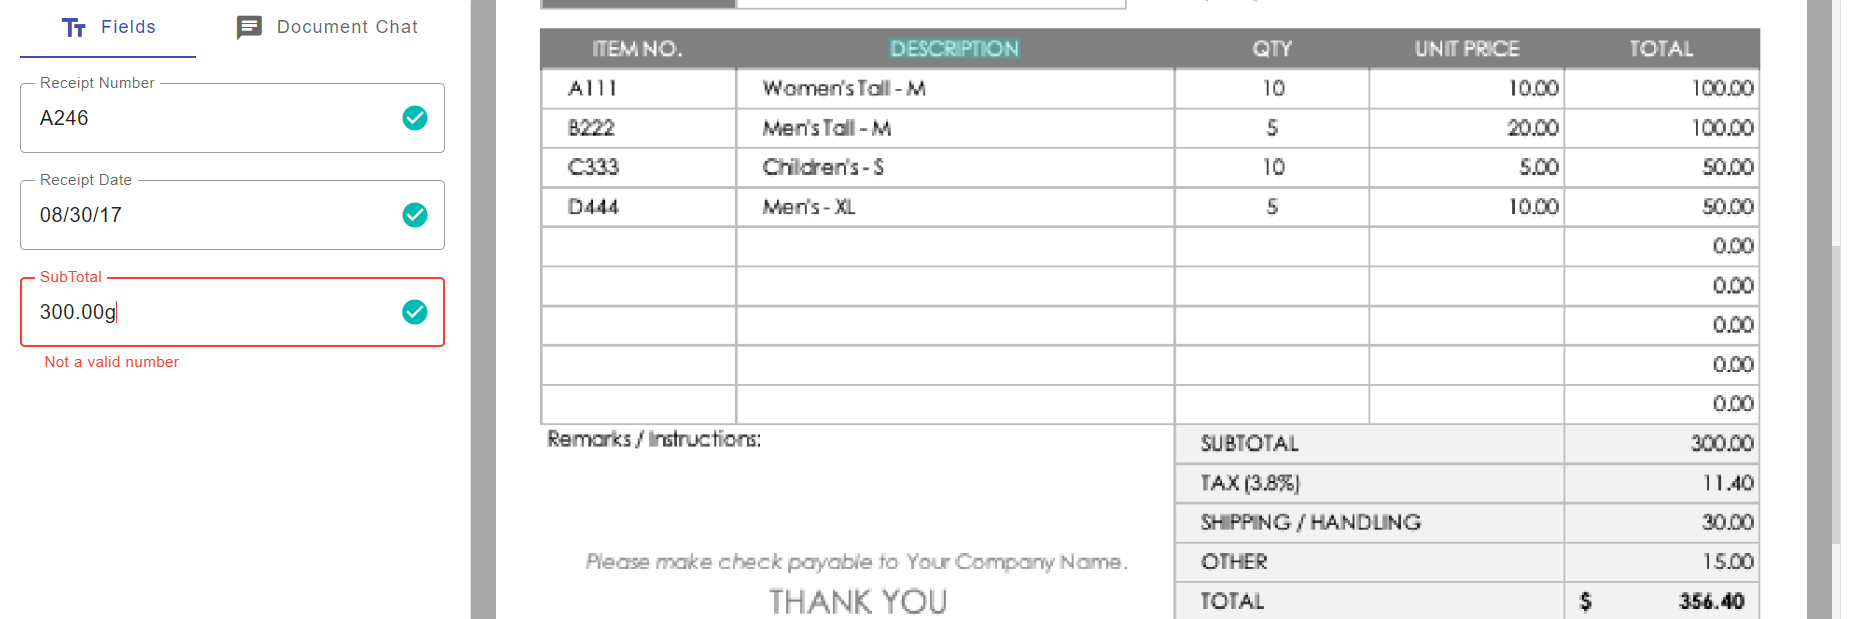
- Validation Rules: DocAcquire applies predefined validation rules (e.g., date format, numeric ranges). Any fields that fail validation will be highlighted, prompting you for correction.

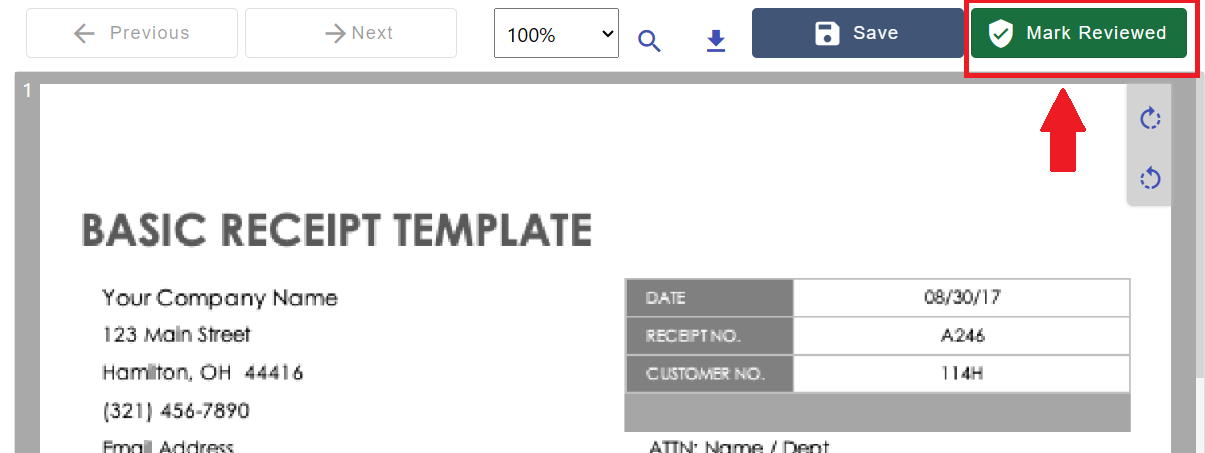
- Marking Documents as Reviewed:
- Once you have verified all extracted data and made any necessary corrections, you can either click "Save" to preserve your changes or directly click the "Mark Reviewed" button, which will save all changes and move the document to the Reviewed stage.
- This action moves the document from the "Awaiting Review" stage to "Reviewed," indicating it's ready for export.
- Reviewed documents can now be exported, integrated into other systems, or used in business workflows.
7. Export the Document
Once your documents are marked as Reviewed, they’re ready for export so you can integrate the extracted data into other systems or reports.
DocAcquire offers multiple export options, including,
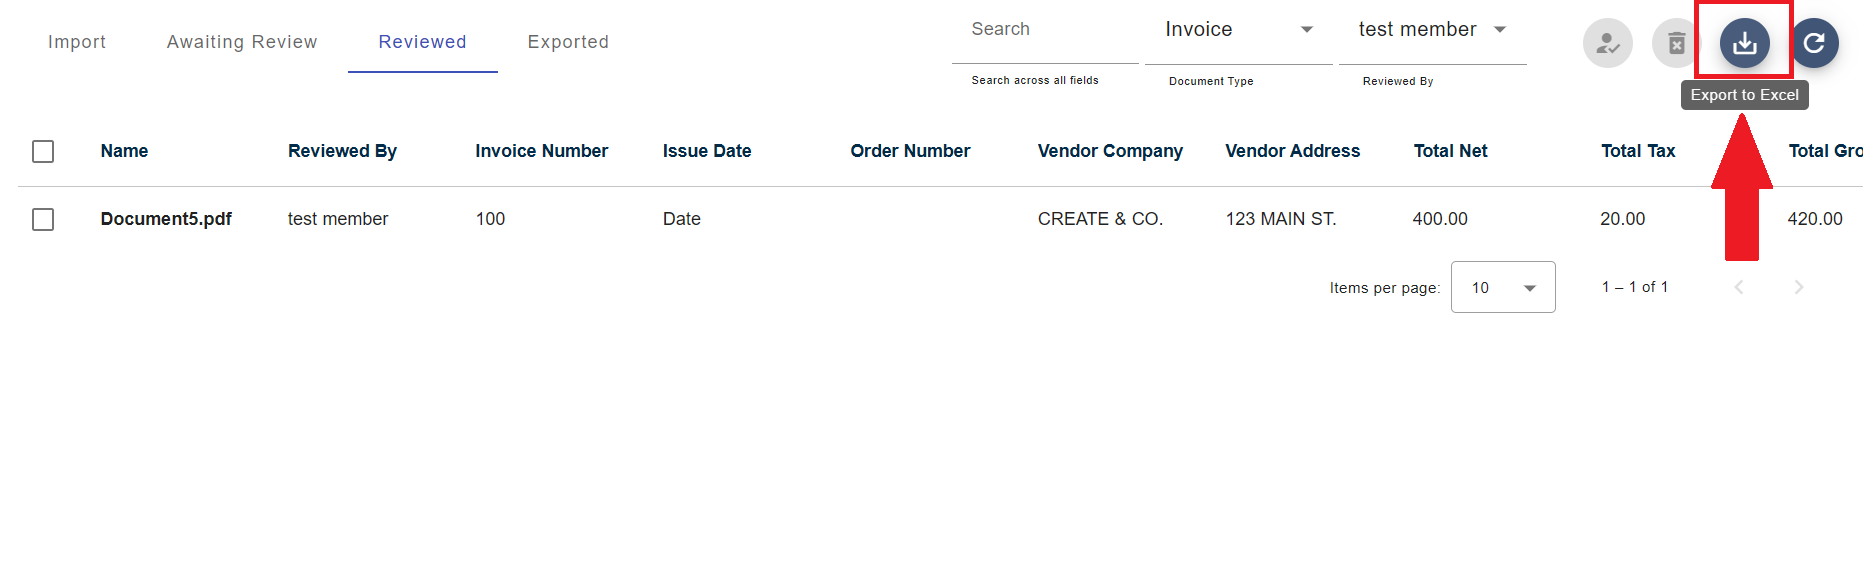
Export to Excel
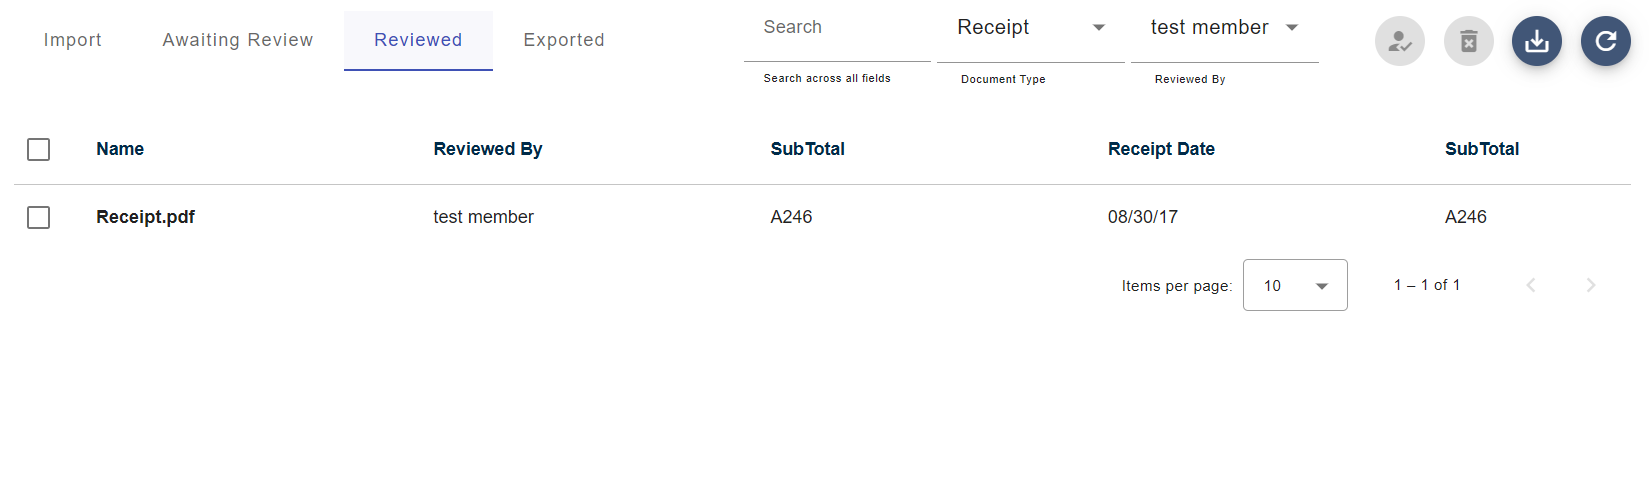
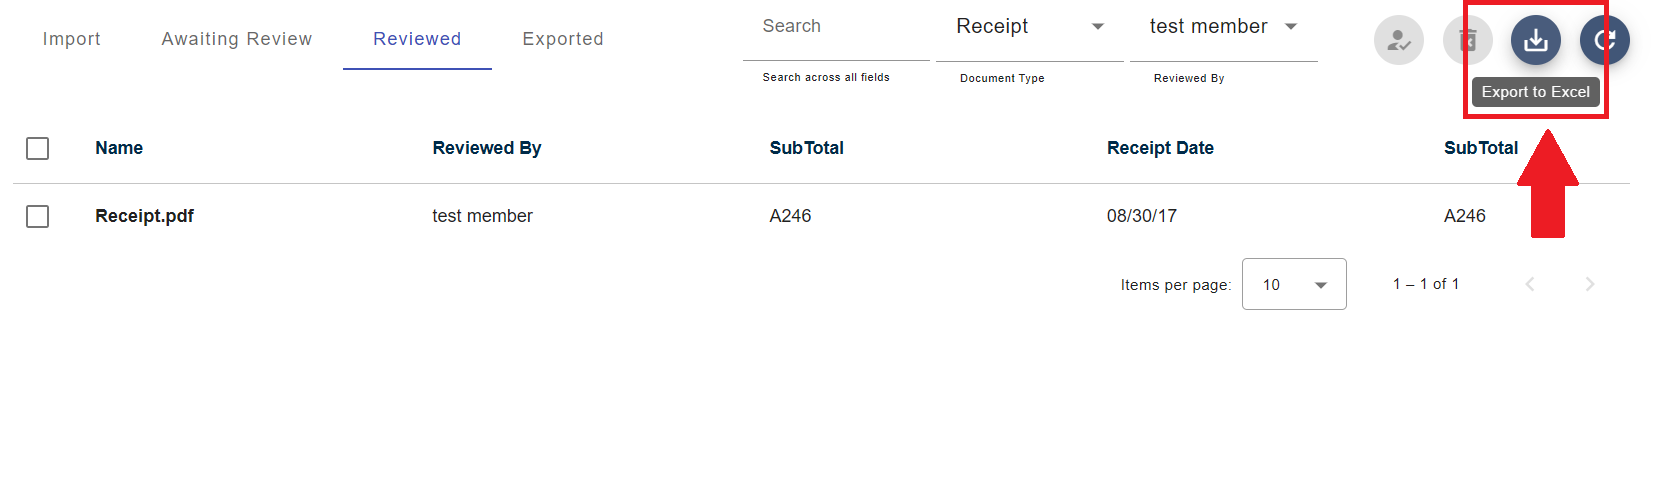
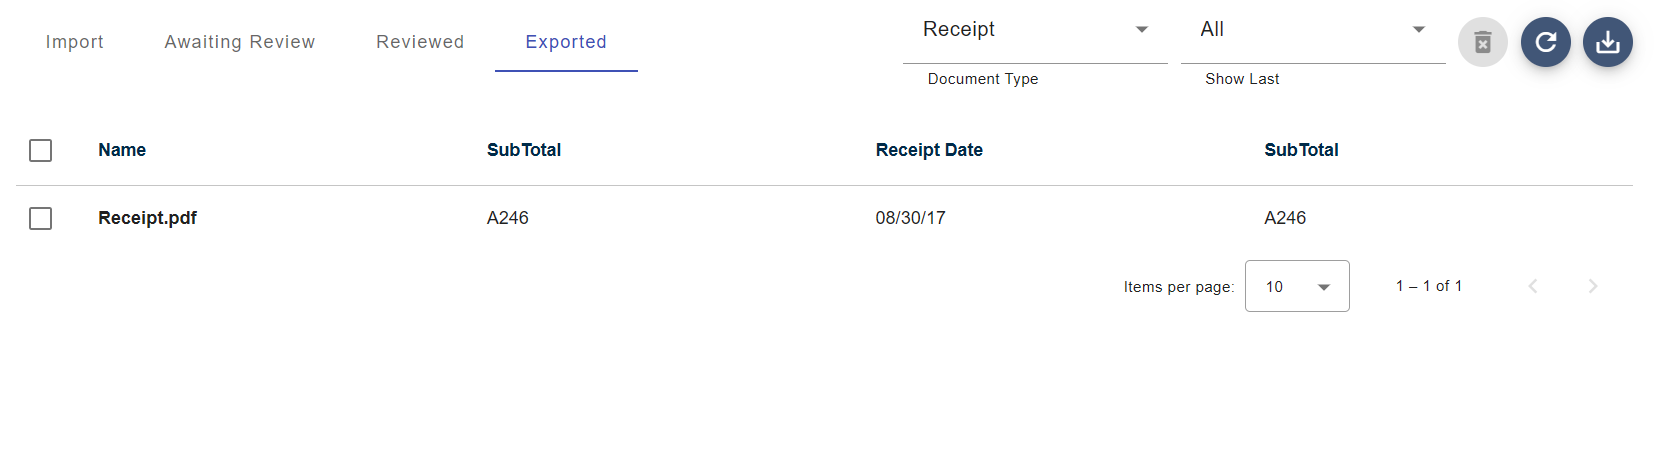
- Click on the Reviewed tab under the Documents section to see all documents that are marked as Reviewed.
- At the top of the screen, click Export to Excel if you wish to download the Excel file immediately.
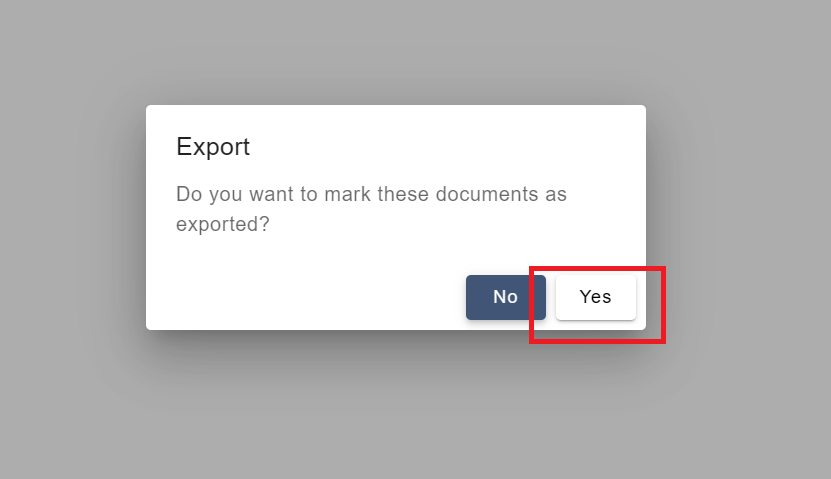
- Then the message “Do you want to mark these documents as exported?” appears, click Yes to proceed with the export.
- Once you confirm export, all the reviewed document(s) will move from the Reviewed stage to the Exported tab, indicating they’ve been exported.
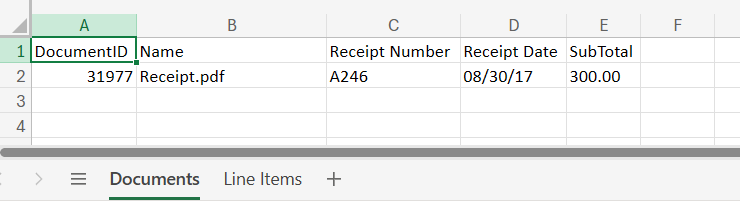
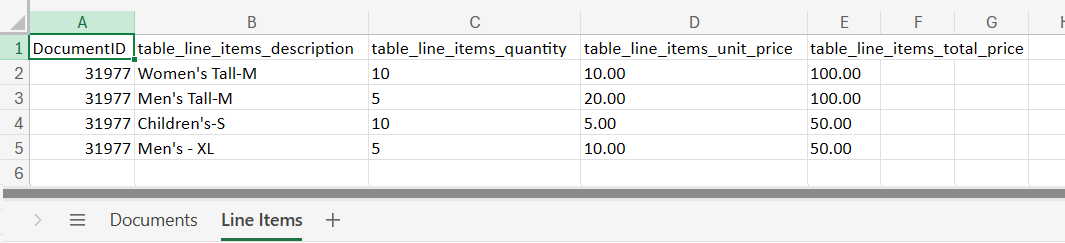
DocAcquire generates an Excel file containing all extracted fields and tables (if applicable).
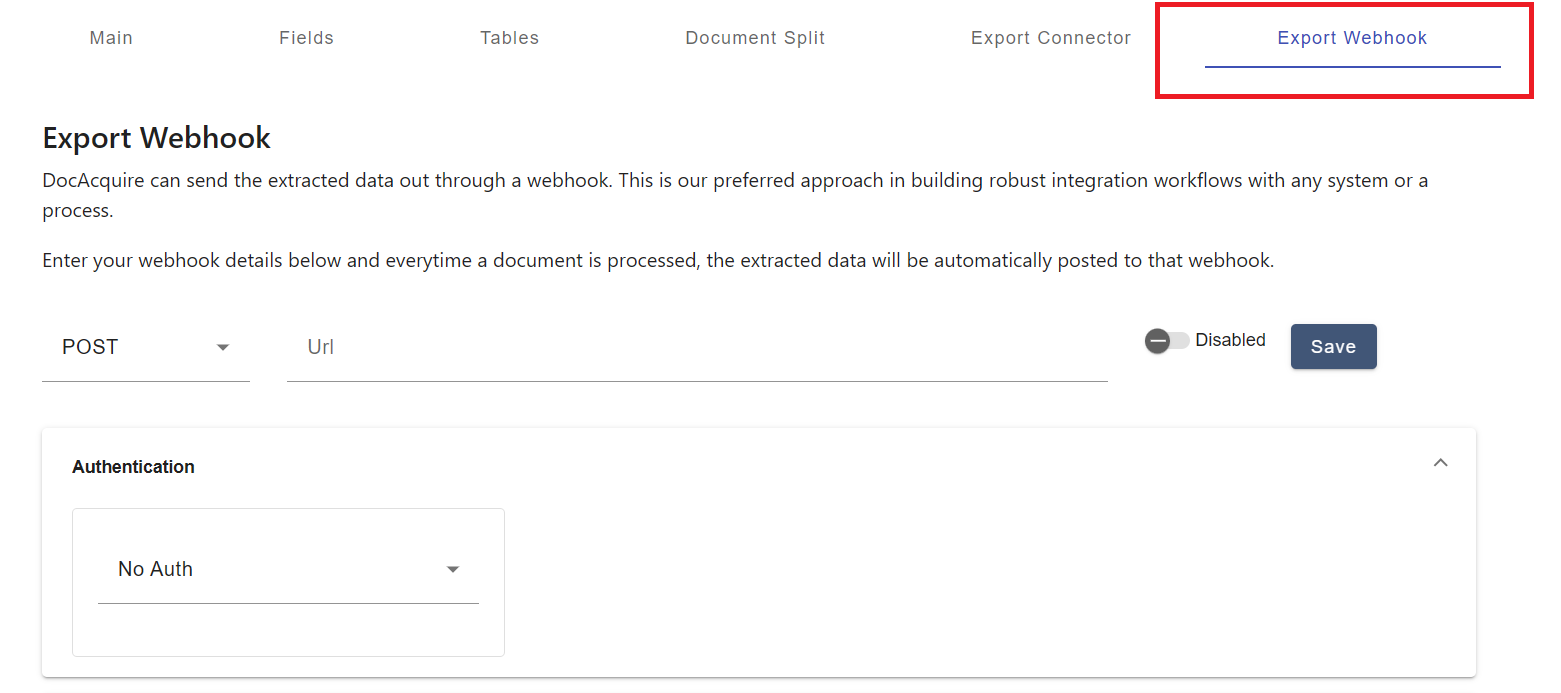
Export via Webhooks
If you want to automate your workflow and send extracted data directly to other systems (like an ERP, database, or custom app), you can use webhooks in DocAcquire. Here’s how to set it up:
How to Configure Webhook Export
- Click Document Types in the left menu, and select the Document Type you want to configure.
- Go to the Export Webhooks section inside your document type and click on it.
- Set Up the Webhook Request
- Choose Request Type: POST (this tells DocAcquire to send data to your system).
- Enter your Target URL — this is where DocAcquire will send the extracted data.
- (Optional) Add any Authentication Headers if your system requires login or API keys.
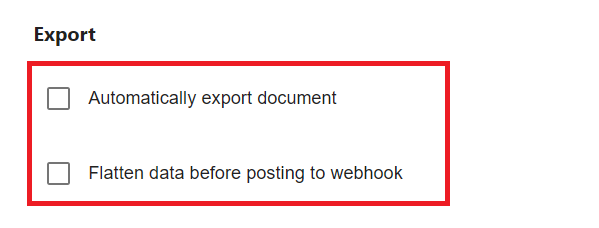
- Configure Export Options. Inside the Main section, you’ll see two important options:
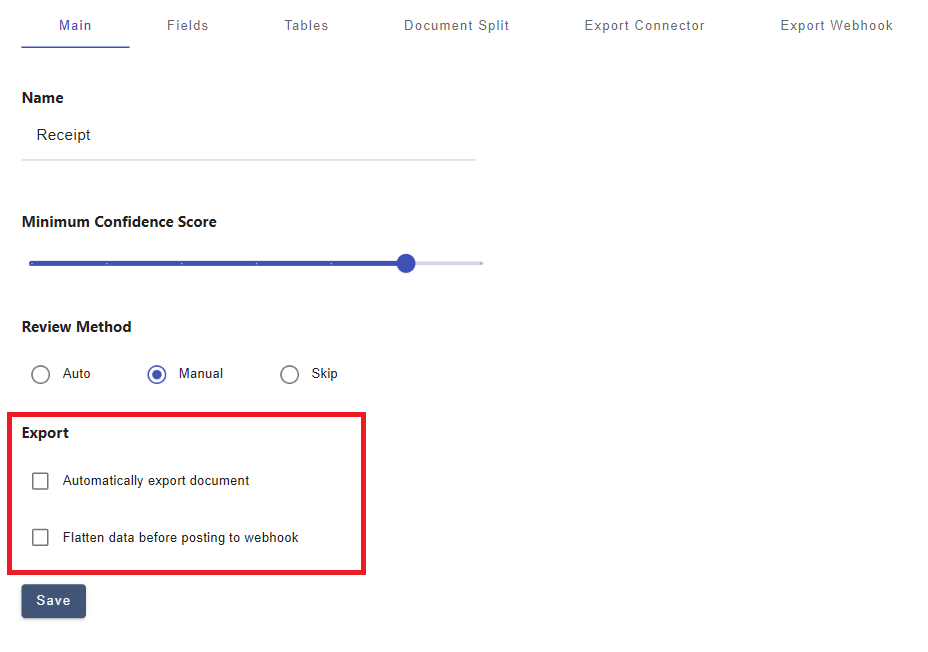
Automatically Export Document
- Turn this on if you want DocAcquire to send the extracted data automatically as soon as the document is marked as Reviewed.
- This is especially useful if you’re using Skip Review, because:
- Skip Review moves documents straight to the Reviewed stage without any manual checks.
- Enabling Automatic Export means your data flows out immediately to your connected system without any manual steps.
- Perfect for fully automated workflows where speed matters.
Flatten Data Before Posting to Webhook
- Turn this on if you want the data to be sent in a simple property/value format rather than a nested JSON structure.
- This makes it easier for your system to handle the data, especially if your app doesn’t support complex data formats.
Quick Recap
- Automatically Export Document → sends data right after processing finishes.
- Flatten Data → makes the data simpler and easier for your app to read.
- Combine with Skip Review → for a fully automated, no-touch workflow!
Export via API (API Integrations)
For more complex integrations and programmatic control, DocAcquire offers a comprehensive API.
How to Use:
- To authenticate with the DocAcquire API, you can obtain an OAuth access token from the OAuth section under the Account Section in DocAcquire.
- Use the DocAcquire API to programmatically query for validated documents, retrieve their extracted data, and manage document statuses.
- This method offers the highest flexibility for building custom integrations with your CRM, ERP, accounting software, or other business intelligence tools.
- Refer to the DocAcquire API Reference Documentation for details on how to retrieve verified document(s) and mark them as exported via API.
We hope this structured user guide helps you effectively utilize DocAcquire to streamline your document processing. For any further questions or assistance, Contact Us.
Settings
The Settings page provides a centralized space to manage core parts of your account. From here, you can manage users, define and maintain lookups, and set up external connections to support your integration and platform requirements.
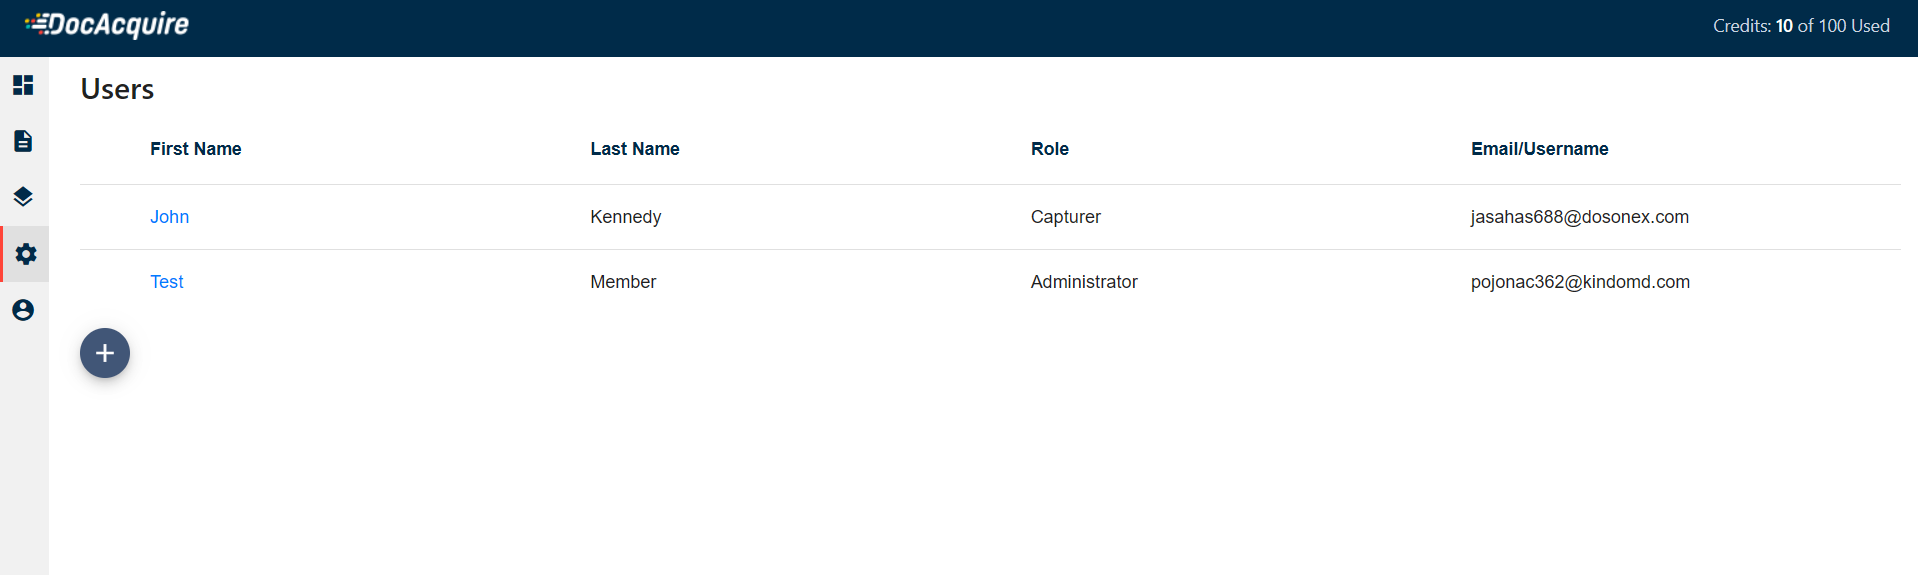
User Management
Manage users and their roles within your DocAcquire account. You can add, edit, or Lock users, assign roles, and control access to various features based on permissions.
Add User
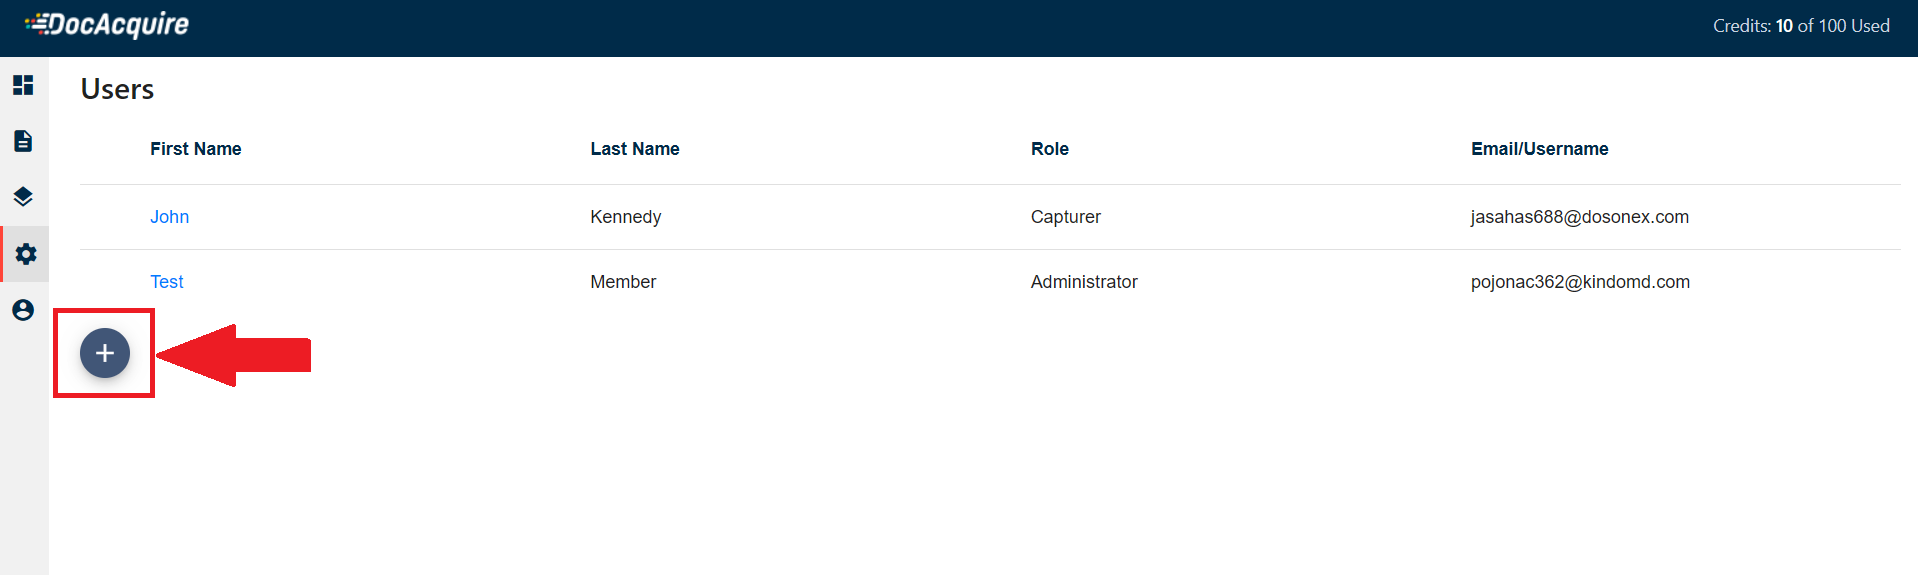
To add a new user to your account:
- Go to the Users page
- Click the "+" Add User button
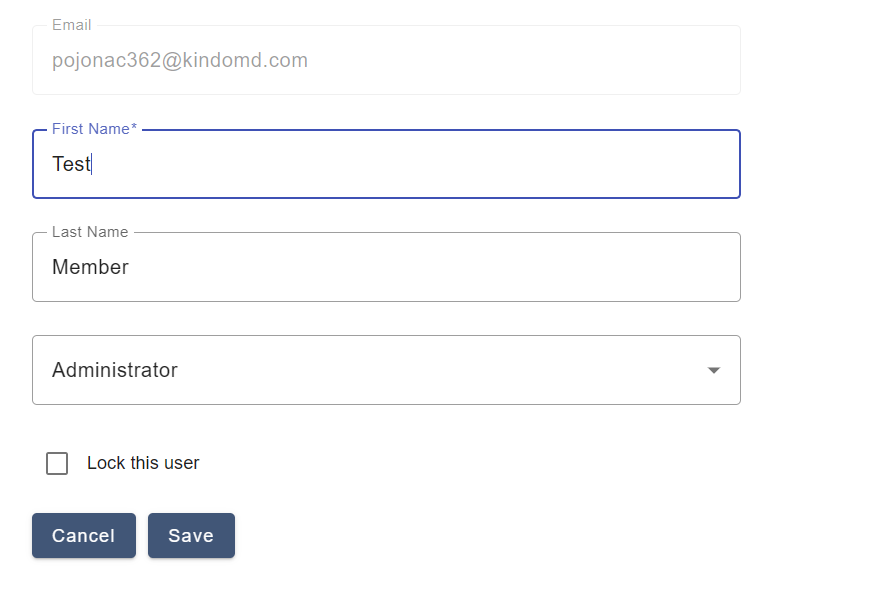
- Fill in the user details in the form:
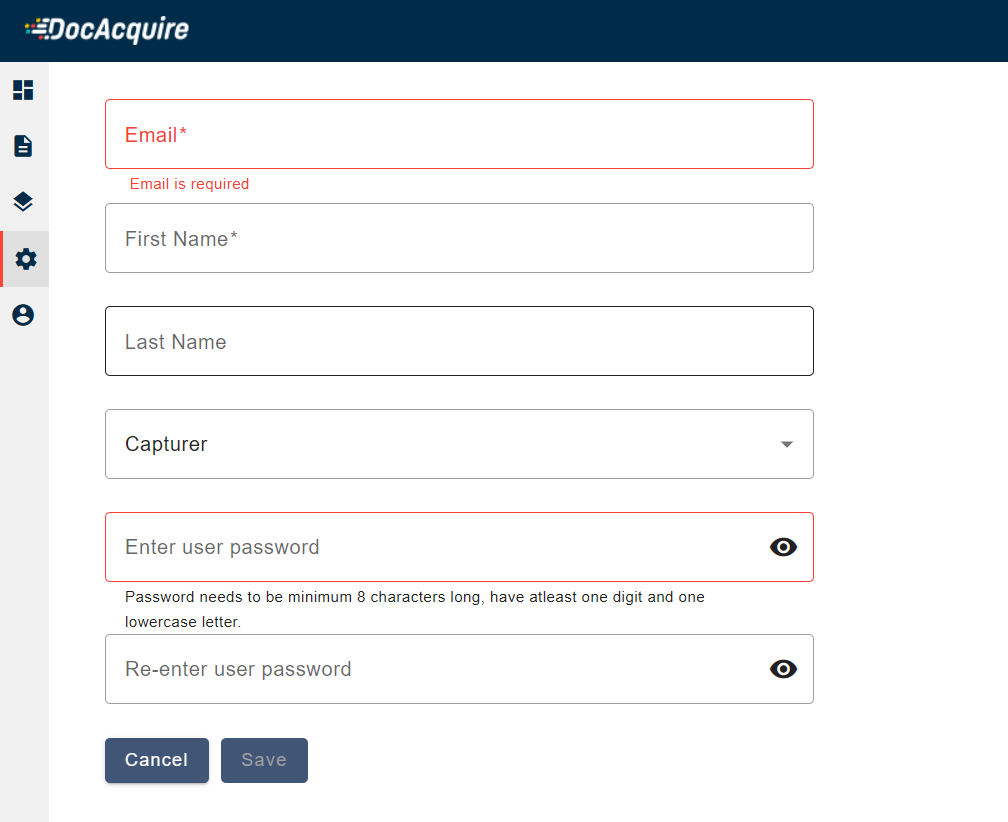
- Email (required): Enter the user's email address. This will also serve as their username.
- First Name (required): Provide the user's first name.
- Last Name (optional): Add the user's last name.
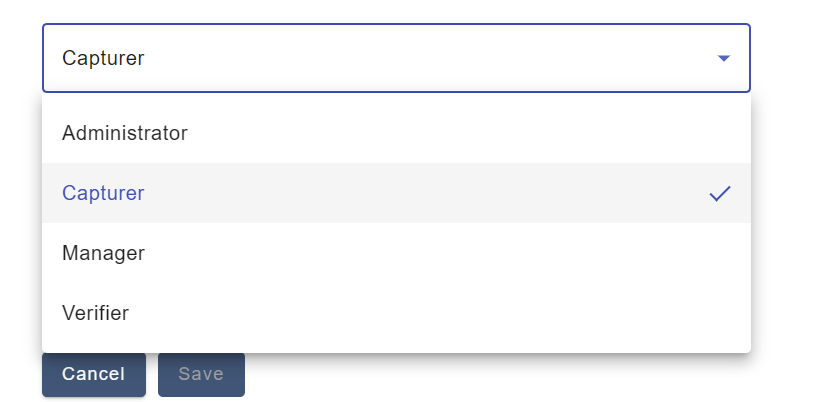
- Role: Select a role from the dropdown-options include:
- Administrator: Full access to all settings and features.
- Capturer: Can upload and manage documents.
- Manager: Oversees teams and has intermediate privileges.
- Verifier: Responsible for reviewing extracted data.
- Password: Create a password that meets the minimum requirements:
- At least 8 characters long
- Contains at least one digit
- Contains at least one lowercase letter
- Re-enter Password: Confirm the password.
- Save or Cancel:
- Click Save to create the user.
- Click Cancel to discard the changes.
Navigate to the Settings → Users section. You will see a list of all existing users.
You'll find this button on the left side of the Users page (represented by a plus icon inside a blue circle).
If any required field (e.g., email or password) is missing or invalid, the form will highlight the issue in red and prevent submission until corrected.
Edit User
You can edit an existing user to update their personal details, change their role and permissions, or lock their access.
- Go to the Users page
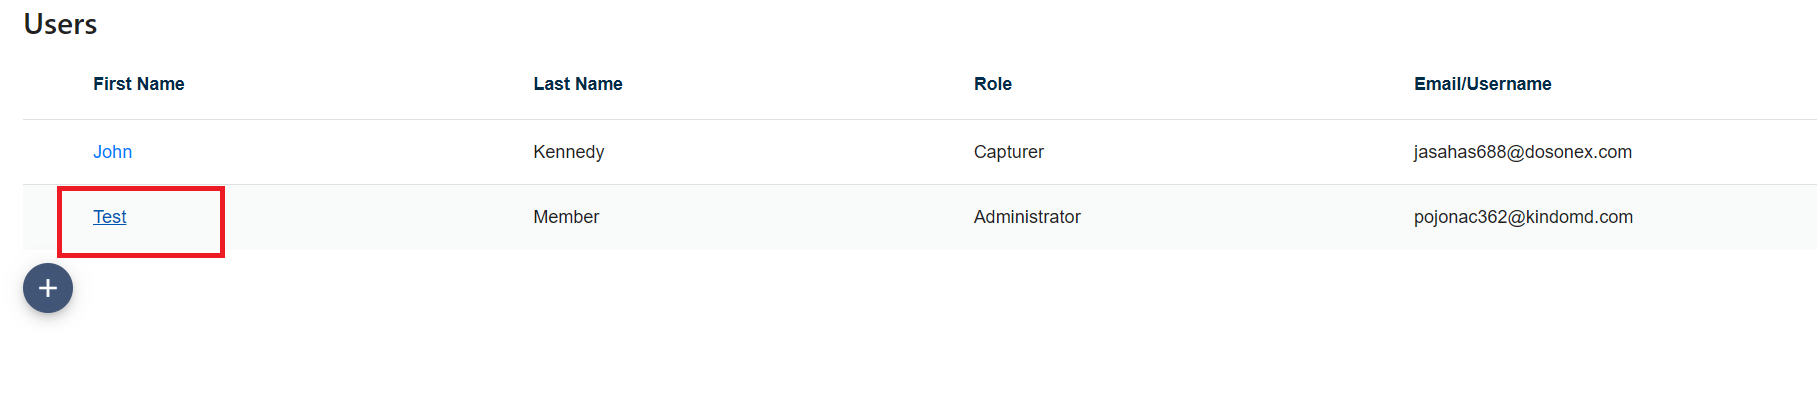
- Click on the user's First Name
- Update the necessary fields:
- First Name: Modify the user's first name.
- Last Name: Edit the last name if needed.
- Role: Use the dropdown to change the user's role. Options include:
- Administrator
- Capturer
- Verifier
- Manager
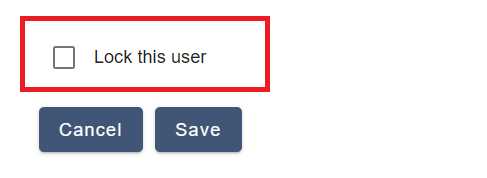
- Lock this user (optional): Check this box to disable the user's login access while keeping their data in the system. Useful for temporary or security-related restrictions.
- Click Save to apply the changes, or Cancel to discard them.
Navigate to the Settings → Users section. You will see a list of all existing users.
The name appears as a clickable link in the First Name column. This opens the user's detail form for editing.
Note: The Email field is disabled and cannot be edited, as it serves as the unique identifier for the user account.
Best Practices
To ensure optimal usage and efficiency with DocAcquire, consider these best practices:
- Clear Naming Conventions: Use descriptive and consistent names for your Document Types, fields, and tables. Giving each Document Type a clear and specific name—based on the documents that will be uploaded against it—is crucial for accurate document classification and streamlined processing.
- Granular Field Definitions: Be as specific as possible when defining fields and providing instructions. This helps DocAcquire's extraction model achieve higher accuracy.
- Strategic Verification Methods: Choose your review method (Auto, Manual, Skip) based on the criticality and consistency of your documents. High-value or highly variable documents may benefit from Manual Review, while consistent, low-risk documents are perfect for Auto or Skip Review.
- Leverage Webhooks for Automation: For seamless integration with other business systems, utilize webhooks. Combine with "Automatically Export Document" and "Flatten Data" for robust, automated workflows.
- Regular Review of Extracted Data: Even with Auto Review, periodically spot-check extracted data to ensure accuracy and identify any potential issues or areas for improvement in your document type configuration.
Frequently Asked Questions
1. How does DocAcquire simplify document-based workflows?
DocAcquire is an intelligent document processing (IDP) platform that automates the extraction, classification, and validation of data from a wide range of business documents. By converting unstructured or semi-structured files into clean, structured data, DocAcquire helps organizations eliminate manual data entry, reduce processing time, and improve accuracy across critical workflows.
2. How does DocAcquire make working with documents easier?
DocAcquire helps you save time by automatically reading and pulling out important data from your documents—like invoices, receipts, or forms. It sorts, checks, and organizes the information for you, so you don't have to enter it manually. This means faster work, fewer mistakes, and smoother business processes.
3. How do I sign up for a DocAcquire account?
To register, head over to the DocAcquire registration page, fill in your details like name, company email, organization name, and create a strong password (must include uppercase, lowercase, digit, and symbol). Don't forget to check the CAPTCHA box and hit Register.
4. How do I activate my account?
After registering, check your email inbox for a confirmation message. Click the activation link inside to verify your account. If you don't see it, check your spam folder.
5. How do I log in once I've registered?
Once your account is activated, go to the DocAcquire login page, enter your registered email and password, and click Log In.
6. What is a document type, and why do I need to create one?
A document type tells DocAcquire what kind of document you're working with—like an invoice or purchase order. This setup helps the system know what data to look for and how to extract it correctly.
7. How do I create a document type in DocAcquire?
Right after logging in, you'll see the Create Document Type page. Choose the kind of document you want to process (e.g., "Invoice"). If your documents include line items (like product lists), select Yes to capture them. Click Create to save your document type.
8. How do I upload documents to DocAcquire?
After setting up your document type, you'll land on the Documents page. You can: Manually upload files from your computer or use the API to upload documents in bulk. DocAcquire will automatically classify and split the documents, or you can handle this step manually.
9. Is my data safe with DocAcquire?
Yes—DocAcquire is built with strong security in mind. All your documents and extracted data are protected using advanced encryption, both when stored and while being transferred. We also follow strict data protection regulations to ensure your information is kept private, secure, and handled responsibly at every step.
10. Does DocAcquire have ready-to-use document types?
Yes! DocAcquire includes several built-in document types like invoices, purchase orders, contracts, and passports. These templates come preconfigured with important fields and smart extraction rules, so you can start processing documents right away—no setup needed.
11. Can I create my own document type in DocAcquire?
Absolutely! If you're working with documents that don't fit the built-in templates or need to extract custom fields, you can easily create a custom document type.
12. How do I upload a document in DocAcquire?
Go to the Documents tab on the left sidebar and click Import Documents. You can upload files manually from your computer in supported formats like PDF, JPEG, PNG, or TIFF.
13. What happens after I upload a document?
Once uploaded, DocAcquire automatically starts processing your document in the background. It goes through classification (to identify the document type) and splitting (to divide multi-doc files into separate documents, if needed).
14. Can I keep working while documents are processing?
Yes. DocAcquire processes documents asynchronously, so you can continue using the platform while files are being analyzed.
15. What is document classification in DocAcquire?
Classification means identifying what type of document was uploaded—like an invoice or a contract. You can classify documents in two ways: Auto Classification - DocAcquire figures out the document type on its own. Manual Classification - You select the document type before uploading.
16. When should I use Auto Classification?
Auto Classification is best when: You're uploading mixed document types in one batch. You're unsure of the document type. DocAcquire will assign the best-matching type automatically.
17. What is Manual Classification, and when should I use it?
Use Manual Classification when you know exactly which document type(s) you're uploading. This gives you precise control and ensures DocAcquire uses your configured fields and rules.
18. What is document splitting in DocAcquire?
Splitting breaks one large file into smaller, individual documents—useful when a single file contains multiple forms, invoices, or pages to be processed separately.
19. How does DocAcquire split documents?
You have two options: Rule-Based Splitting - Set rules inside your Document Type for when and how to split. AI Splitting (Default) - If no rules are set, DocAcquire uses AI to detect logical breaks based on content and layout.
20. Can I upload documents through the API instead of the UI?
Yes. DocAcquire offers an API that allows you to upload and process documents programmatically perfect for integrating into your existing apps or workflows.
21. What are document lifecycle stages in DocAcquire?
Each document in DocAcquire moves through a set of statuses (or stages) that show where it is in the processing pipeline—from upload to export. These stages help you track progress, fix issues, and ensure everything runs smoothly.
22. What does 'Queued' status mean?
A document marked as Queued is waiting its turn to be processed. This usually happens when several files are uploaded at once, or when system resources are temporarily busy.
23. What happens during the 'Processing' stage?
When a document is Processing, DocAcquire is actively analyzing it—reading the content, applying your setup rules, and extracting data using AI.
24. What does 'Awaiting Review' mean?
This means DocAcquire has finished extracting data, and the document is ready for you (or your team) to review. You can check, edit, and confirm the results before moving forward.
25. What is the 'Reviewed' status?
Once you verify and approve all extracted data, the document becomes Reviewed. This means it's ready to be exported or integrated into other systems.
26. What does 'Exported' mean?
A document reaches Exported status when its data has been successfully sent to its final destination—like a file download, system integration, or API.
27. What should I do if a document status is 'Failed'?
The Failed status means something went wrong during processing. This could be due to: No data to extract, Corrupt or password-protected file, File format issues, A processing timeout. Check the error message and either fix the issue or requeue the document for another attempt.
28. What does 'Requeued' mean?
If you choose to reprocess a failed document, it enters the Requeued stage. This sends it back into the queue so it can go through the lifecycle again—without needing to re-upload.
29. When should I requeue a document?
Requeue a document when: Temporary issues (like system load) are resolved, You've fixed extraction rules, You want to retry processing without uploading again.
30. What are Document Type Settings in DocAcquire?
Document Type Settings let you customize how each document type behaves—from how it's split and reviewed to how data is exported. These options help you tailor the processing flow to match your business needs.
31. Can I create custom fields based on calculations?
Yes. With Calculated Fields, you can define values using formulas based on other extracted data—like totals, taxes, or percentages. This helps automate common calculations without needing to do them manually.
32. What are Splitting Rules, and when should I use them?
Splitting Rules control how multi-page documents are divided into individual records. They're especially useful when uploading scanned files or batches that contain multiple invoices, forms, or receipts in one file.
33. What is a Confidence Score Threshold?
The Confidence Score Threshold lets you decide how accurate the extracted data must be before it's approved. If a document's score is lower than your threshold, it will be flagged for manual review—unless you've chosen to skip reviews entirely.
34. How can I control where the data gets exported?
Under Export Options, you can enable automatic export and choose where the data should go (e.g., via API or webhook). You can also simplify the output format using the "flatten" option to send data as basic key-value pairs.
35. What is the Review Method setting?
The Review Method controls how documents are checked after extraction: Auto: Documents are marked as reviewed if they meet confidence and validation criteria. Manual: Every document must be reviewed by a user. Skip: Bypasses review altogether; documents go straight to export.
36. What are Webhooks used for in DocAcquire?
Webhooks let you send real-time updates to other systems when certain events occur—such as when a user clicks the Export button after a document is reviewed, or if the document type's Export Options are configured to automatically export the document. They're especially useful for triggering actions in connected apps or systems automatically.
37. What is document verification in DocAcquire?
Document verification is the process of ensuring that the extracted data is accurate and meets your validation rules before it's marked as complete and ready for export or integration.
38. What are the available document verification options?
DocAcquire offers three verification modes: Auto Review, Manual Review, Skip Review.
39. How does Auto Review work?
In Auto Review, DocAcquire automatically checks extracted data against your configured validation rules. If everything passes and meets the confidence threshold, the document is marked as Reviewed without human involvement.
40. When should I use Auto Review?
Use Auto Review for high-volume, consistent document types where the AI performs reliably—like utility bills, standardized invoices, or forms with fixed layouts.
41. What is Manual Review?
Manual Review requires a user to inspect, correct, and approve the extracted data. Only after this review is the document marked as Reviewed.
42. When is Manual Review recommended?
Choose Manual Review for critical or complex documents, such as contracts or varied invoice formats, where accuracy is essential and automation may not catch everything.
43. What does Skip Review mean?
With Skip Review, the document skips validation and manual checks. It is automatically marked as Reviewed right after processing.
44. Is it safe to use Skip Review?
Skip Review is best used for low-risk documents where speed is a priority and accuracy checks are not mandatory. Use it cautiously, especially in workflows that involve sensitive or financial data.
45. How do I configure the review method for a document type?
- Go to your Document Type configuration page.
- Scroll to the Review Method section.
- Choose between Auto, Manual, or Skip.
- Click Save to apply your changes.